

- Always turn off water and power supplies before starting to protect yourself from unexpected leaks, floods, or electrical hazards.
- Gather all necessary tools and materials in advance to streamline the sink removal process and minimize interruptions.
- Follow a clear, step-by-step method to minimize the risk of accidental damage to your fixtures, counters, or plumbing connections.
- Sometimes, it is safer and more efficient to reach out to plumbing professionals; don’t hesitate if you encounter obstacles or uncertainties.
Removing a kitchen sink is a significant DIY project that many homeowners consider when renovating, repairing, or upgrading to a more modern or functional fixture. While the thought of dismantling plumbing fixtures can seem intimidating, especially if you lack experience with household repairs, careful preparation is your best ally. The right safety measures and an organized approach can transform what may appear complex into a straightforward and even rewarding process. Additionally, understanding exactly what tools you will need and how best to protect your kitchen and its finishes plays a vital role in avoiding unnecessary headaches as you work through the removal. Ensuring that your workspace remains dry and undamaged, while also safeguarding yourself from potential hazards, is just as important as removing the sink itself.
Whether your project involves a full kitchen remodel or simply replacing an outdated or malfunctioning sink, the most efficient approach is to plan and follow a clear set of steps. This reduces the risk of mess, costly mistakes, or even injury. Approach the process methodically, breaking it down into manageable stages so you retain control over your working environment. Curious about everything that’s involved? This comprehensive guide offers a step-by-step walkthrough, highlighting key safety precautions at each phase. You’ll also find practical tips for safely handling plumbing disassembly, cleaning up after removal, as well as professional advice on when to consider calling in expert help. By investing a few hours into preparation and careful work, you can make your kitchen sink removal a smooth and empowering DIY experience.
Preparation: Setting the Stage
Before removing any part of the kitchen sink, meticulously set up your workspace for both safety and efficiency. A rushed or disorganized area exposes you and your kitchen to avoidable damage. First, take time to clear all cleaning supplies, pots, pans, and other items from the cabinet beneath the sink to create an uncluttered space to work. This way, you’ll have unhindered access to all connections and avoid accidental breakage or contamination.
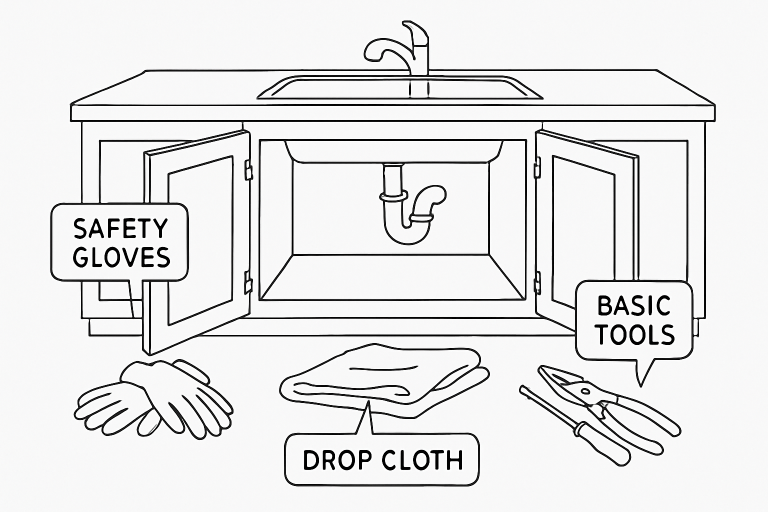
- Clear the Area: Empty the area under the sink and ensure surrounding countertops are clear as well. Doing so not only gives you better mobility but also lessens the chances of tools or parts falling onto stored items.
- Protect Surroundings: Cover the surfaces below and around the base of the sink with old towels or a heavy-duty drop cloth, which can absorb stray drips and catch any tools or mounting hardware that might be dropped during removal. This precaution also safeguards cabinet interior surfaces and nearby flooring from water and scratches.
- Safety Gear: Prioritize your own safety by wearing sturdy work gloves, which prevent scrapes on sharp sink edges or small plumbing components, and safety goggles to protect your eyes from flying debris, dust, or chemical residue that may be present when removing caulking and pipes.
Step 1: Shut Off Utilities
Begin by disconnecting all critical utilities. This step is essential to provide maximum safety throughout the project. Never skip this stage, as it prevents accidents such as water bursts or unexpected electric shocks.
- Water Supply: Underneath the sink, you should find two separate valves—one for hot water and one for cold water. Turn both clockwise until firmly shut. If your house lacks individual shutoff valves or they won’t turn off completely, locate your main water shutoff valve (usually found in a basement or utility closet) to stop water flow to the whole house.
- Electricity: If your sink area includes accessories requiring electricity—such as garbage disposals or instant hot water dispensers—unplug these devices. For added safety, trip the appropriate breaker at your electrical panel to cut power to the area completely.
Once water and power are safely off, double-check by turning the faucet handles and flipping switches to confirm nothing is operational. This extra caution prevents accidental flooding and reduces the risk of injury while you work under the sink.
Step 2: Disconnect Plumbing
Once you’ve protected the area against incidental hazards, proceed to dismantle the plumbing. Carefully removing these connections is crucial to avoid leaks and make your job easier.
- Drain Pipes: Position a small bucket or basin directly under the P-trap, the U-shaped section of pipe that collects debris and prevents sewer gases from entering your home. Use adjustable pliers or a pipe wrench to gently loosen the slip nuts at each end of the P-trap. Slowly lower the trap to release any water, minimizing spills. If the trap seems stuck due to corrosion, apply gentle pressure or use penetrating oil to loosen it.
- Garbage Disposal: If your sink is equipped with a garbage disposal, follow the manufacturer’s instructions for removal. Usually, you must first disconnect the power source and then loosen the mounting ring or locking screws that secure the disposal to the sink flange. Gently twist and lower the disposal; it can be surprisingly heavy, so support its weight as you remove it. Set all hardware aside for reuse or replacement.
- Dishwasher Hose: If your dishwasher drains through your sink’s plumbing, disconnect this hose after first clamping or taping it to prevent drips. Loosen the clamp with pliers or a flathead screwdriver, then place a towel nearby to absorb any residual water. Consider examining the hose for wear or brittleness and replace it if needed during reinstallation.
Step 3: Detach the Sink
With plumbing lines out of the way, your attention shifts to releasing the sink from its countertop. Sinks are typically secured by a combination of mounting hardware and adhesive, depending on installation method (top-mount, under-mount, etc.).
- Mounting Clips or Brackets: Feel beneath the sink’s edge to locate all metal clips, brackets, or wingnuts that fasten it to your counter. Loosen each with a screwdriver or pliers, working methodically around the perimeter. Most standard sinks use 4–6 fasteners; don’t force anything if it seems stuck, as this might damage the counter.
- Break the Seal: Old caulk or sealant often bonds a sink’s edge to the countertop. Carefully insert a utility knife or putty knife under the rim and slowly cut through the caulk, using steady, gentle motions to avoid scratching adjoining surfaces. Removing all the old sealant allows the sink to lift out cleanly.
- Lift Out the Sink: Once you are certain that all attachments and sealant are free, lift the sink straight up, or, if necessary, push gently from below. Do this slowly to monitor for remaining caulk or hardware you might have missed. If you feel resistance, stop and double-check your work before proceeding; prying too forcefully can crack or chip the counter.
Step 4: Clean the Area
Thorough cleaning ensures the sink cavity and surrounding counter are ready for a new installation or repair. Proper cleanup also helps you spot potential problems that could affect future projects.
- Remove Residual Caulk or Adhesive: Use a plastic putty knife to scrape away all remnants of caulk or adhesive gently. Avoid using metal tools aggressively near stone countertops, as this could cause gouging or scratches.
- Inspect the Countertop: Check carefully for chips, soft spots, water damage, and mold. If you spot damage, address it now—level uneven surfaces with wood filler, or treat mold with specialized cleansers before continuing. A well-prepared surface ensures your new sink will seal tightly and last longer.
When to Seek Professional Help
While many homeowners are successful in tackling this project independently, there are a few scenarios where it’s best to hire a licensed plumber or contractor. Not every setback is easily fixed with DIY effort, and specialized skills can ultimately save both time and money.
- Complex Plumbing Arrangements: Older homes can have unique or unexpected plumbing quirks, such as non-standard pipe sizes, drainage reroutes, or hidden shutoff valves. If you encounter anything unfamiliar, it may be safer to pause and consult an expert before proceeding.
- Heavy or Delicate Materials: Some sinks, like those made from cast iron or porcelain, are both heavy and fragile. Moving these materials safely often requires the assistance of more than one person and the proper equipment to prevent injury or accidental breakage.
- Limited Time: If your project deadline is tight—perhaps you’re preparing your home for sale or entertaining guests—professional plumbers can complete the work more quickly, minimizing kitchen downtime and ensuring everything meets local codes and standards.
Conclusion
With proper planning and attention to safety, removing a kitchen sink can be a relatively straightforward DIY project for most homeowners. By systematically disassembling utilities, plumbing connections, and securing hardware, you minimize both risks and stress while preparing your kitchen for beautiful upgrades or necessary repairs. Should you encounter unexpected challenges or feel uncertain at any stage, there is no substitute for quality artistry. Consulting with a professional protects your investment and ensures long-term peace of mind.
“In a world of instant takes and AI-generated noise, John Authers writes like a human. His words carry weight—not just from knowledge, but from care. Readers don’t come to him for headlines; they come for meaning. He doesn’t just explain what happened—he helps you understand why it matters. That’s what sets him apart.”