

Printer test page is a specialized document designed to evaluate your printer’s performance, diagnose quality issues, and verify that all components are working correctly. Whether you’re experiencing streaks, faded colors, or misalignment, printing a diagnostic test page is the essential first step to identify and resolve printer problems.
Why You Should Print a Test Page: Key Diagnostic Purposes
Regular test printing helps maintain optimal printer performance and catches problems early before they affect your important documents. Understanding when and why to run diagnostic tests can save you time, ink, and frustration.
Check Print Quality and Colors
Test pages reveal how accurately your printer reproduces colors and text. A properly printed test page should display crisp CMYK color blocks (cyan, magenta, yellow, and black), smooth gradients without banding, and sharp text at various sizes. If any colors appear faded, missing, or inaccurate, this indicates issues with specific ink cartridges or toner levels that need attention.
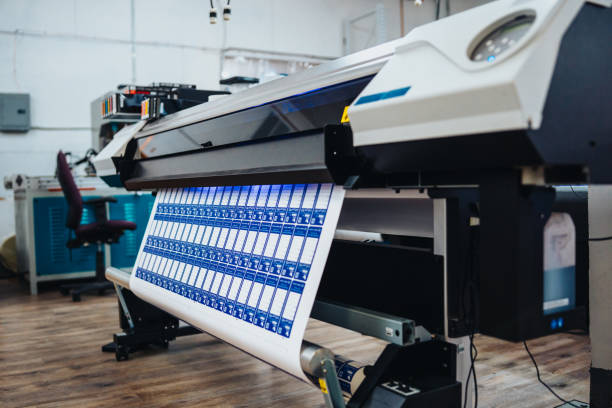
Clean and Align the Print Head
Inkjet printers use tiny nozzles to spray ink onto paper, and these can become clogged over time. A test page includes alignment patterns and nozzle check grids that reveal whether your print head needs cleaning or alignment. Misaligned print heads produce blurry images, double text, or gaps in solid color areas. Running a test print before and after cleaning confirms whether the maintenance resolved the issue.
Diagnose Common Printer Problems
Before calling technical support or replacing expensive components, a diagnostic test page helps pinpoint the exact problem. Test pages can identify clogged nozzles, low ink levels, driver conflicts, paper feed issues, incorrect color calibration, connectivity problems with network printers, and hardware malfunctions requiring professional repair.

How to Print a Test Page: Step-by-Step Methods
There are three primary ways to print a diagnostic test page, each suited to different situations and printer configurations. Choose the method that works best for your setup.
Method 1: Using Our Free Downloadable Test Pages
Download our professionally designed test page PDFs optimized for comprehensive printer diagnostics:
- Standard CMYK Color Test Page: Features color blocks for each ink channel, grayscale gradients, and alignment grid patterns
- High-Resolution Text Test: Includes various fonts and sizes to check clarity and sharpness
- Advanced Calibration Page: Professional-grade test with border margins and precise alignment markers
Steps to use:
- Download the PDF test page that matches your diagnostic needs
- Open the file in Adobe Acrobat Reader or your default PDF viewer
- Click File > Print (or press Ctrl+P on Windows, Cmd+P on Mac)
- Select your printer from the dropdown menu
- Ensure “Actual Size” or “100% scale” is selected (not “Fit to Page”)
- Click Print and collect the page from your output tray
This method works offline and doesn’t require internet connectivity once downloaded, making it ideal for quick diagnostics.
Method 2: Via Your Computer’s Operating System
Most operating systems include built-in test page functions that work with any installed printer.
Windows 10/11 Instructions:
- Open Settings by pressing Windows key + I
- Navigate to Devices > Printers & Scanners (or Bluetooth & devices > Printers & scanners in Windows 11)
- Click on your printer name to expand options
- Select “Manage” then “Print a test page”
- A standard Windows test page will print, showing basic colors and text
Alternative Windows Method (Control Panel):
- Open Control Panel > Hardware and Sound > Devices and Printers
- Right-click your printer icon
- Select “Printer properties” (not “Properties”)
- Click the “Print Test Page” button on the General tab
- Click OK when the confirmation dialog appears
macOS Instructions:
- Open System Preferences (System Settings on macOS Ventura and later)
- Click Printers & Scanners
- Select your printer from the left sidebar
- Click “Options & Supplies”
- Navigate to the Utility tab
- Click “Print Test Page” or “Open Printer Utility”
- Follow the on-screen prompts to print diagnostics
Some Mac printer utilities offer additional tests specific to your printer model, including nozzle checks and alignment patterns.
Method 3: Using the Printer’s Own Hardware Menu
Many modern printers can print test pages directly from their control panel without a computer connection, which is useful for diagnosing connectivity issues.
General Steps (varies by manufacturer):
- Locate the control panel or touchscreen on your printer
- Navigate to Setup, Tools, or Maintenance menu
- Look for options labeled “Print Test Page,” “Print Quality Report,” or “Diagnostic Print”
- Select the option and press OK or Start
- The printer will automatically feed paper and print its internal test page
Brand-Specific Notes:
- HP Printers: Often found under Tools > Print Quality Report
- Epson Printers: Usually in Setup > Maintenance > Nozzle Check
- Canon Printers: Typically in Menu > Setup > Maintenance > Print Test Page
- Brother Printers: Check under Machine Info or Print Reports
Consult your printer’s manual or manufacturer website for model-specific instructions, as menu structures vary significantly between brands and models.
Reading Your Test Page: A Troubleshooting Guide
Once you’ve printed a test page, carefully examine it under good lighting. Each element reveals specific information about your printer’s health.
Color and Ink Issues
| Problem Observed | Likely Cause | Recommended Solution |
|---|---|---|
| One or more colors missing entirely | Empty or improperly installed cartridge | Check ink levels; remove and reseat cartridges; replace if empty |
| Faded or washed-out colors | Low ink levels or incorrect print quality settings | Check ink levels in printer software; select “Best” or “High Quality” mode |
| Color cast (overall tint) | Color calibration issue or mixing of ink types | Run color calibration utility; ensure you’re using manufacturer-recommended ink |
| White horizontal lines in color blocks | Clogged print head nozzles | Run print head cleaning cycle 2-3 times; let printer rest between cleanings |
| Color bleeding or mixing | Incompatible paper type or excess ink | Use printer-recommended paper; check paper type settings match loaded paper |
Alignment and Streaking Issues
| Problem Observed | Likely Cause | Recommended Solution |
|---|---|---|
| Vertical lines or streaks | Clogged nozzles or dirty print head | Run nozzle check and cleaning cycle; manually clean print head if problem persists |
| Misaligned patterns or double images | Print head alignment error | Run automatic print head alignment from printer software |
| Horizontal banding (repeated stripes) | Encoder strip dirty or paper feed issue | Clean encoder strip with lint-free cloth; check for paper debris in feed path |
| Blurry or fuzzy text | Incorrect paper settings or worn print head | Verify paper type setting matches loaded paper; consider print head replacement if printer is old |
| Diagonal streaking | Smudged or dirty rollers | Clean paper rollers with damp cloth; allow to dry completely before printing |
General Print Quality Issues
| Problem Observed | Likely Cause | Recommended Solution |
|---|---|---|
| Completely blank page | Empty cartridges, protective tape still on, or driver issue | Check all cartridges are installed and tape removed; reinstall printer driver |
| Partial printing (cuts off edges) | Incorrect margins or paper size setting | Verify paper size matches printer settings; check for document scaling issues |
| Uneven density (darker on one side) | Print head position or mechanical issue | Run alignment utility; contact manufacturer if problem persists |
| Smudging or smearing | Ink not drying properly | Use higher quality paper; reduce ink density in settings; check for humidity issues |
| Random spots or speckles | Dust inside printer or on paper | Clean printer interior; store paper in sealed package; replace if old |
After identifying issues, perform the recommended maintenance and print another test page to verify the fix worked.
Advanced Printer Testing & Tools
For professional environments or complex setups, additional testing methods provide deeper diagnostics.
Testing Network and Wireless Printers
Network printers require additional verification to ensure connectivity and configuration are correct:
- Print Network Configuration Page: Most network printers can print a page showing IP address, connection status, and network settings. Access this through the printer’s control panel under Network Settings or Information.
- Verify Connection Type: Check whether your printer is connected via Ethernet, Wi-Fi, or USB. Connection issues often stem from switching between these without properly configuring drivers.
- Test from Multiple Computers: If print quality varies between computers on the same network, the issue is likely driver-related rather than hardware-related.
- Check Print Server Settings: For shared printers connected through a print server, verify that the server is properly forwarding print jobs without corruption.
Using Official Manufacturer Diagnostic Tools
Printer manufacturers provide specialized utilities that offer more comprehensive testing than basic test pages:
- HP Print and Scan Doctor: Free diagnostic tool that automatically identifies and fixes common HP printer problems, including print quality issues, connectivity problems, and driver conflicts.
- Epson Print Head Alignment Utility: Provides step-by-step guided alignment with multiple test patterns for precise calibration. Also includes automated nozzle check and cleaning cycles.
- Canon Print Quality Diagnostic Tool: Offers detailed analysis of test patterns and recommends specific maintenance procedures based on detected issues.
- Brother Maintenance Software: Includes firmware updates, detailed status monitoring, and advanced cleaning options not available through standard drivers.
Download these tools directly from the manufacturer’s support website by entering your printer model number. These utilities often provide more effective solutions than generic methods.
Professional Calibration Pages for Precision Work
For photographers, graphic designers, and print professionals requiring accurate color reproduction, standard test pages are insufficient:
ICC Profile Test Charts: These specialized pages help create custom color profiles for your specific printer and paper combination, ensuring colors match what you see on a calibrated monitor.
Grayscale Precision Tests: Feature subtle gradations to identify color casts in neutral tones, critical for black-and-white photography.
Resolution and Sharpness Targets: Include fine line patterns and text at various point sizes to verify your printer is achieving its rated resolution.
Color Gamut Charts: Show the full range of reproducible colors, helping you understand your printer’s capabilities and limitations.
Professional calibration typically requires specialized software like X-Rite i1Profiler or Datacolor SpyderPrint, combined with hardware colorimeters for measuring printed output.
Frequently Asked Questions
How do I print a test page from my wireless printer?
Use any of the three methods described above—wireless printers function identically to wired ones once properly connected to your network. If your computer can’t find the printer, first verify it’s connected to Wi-Fi through the printer’s control panel, then add it through your computer’s printer settings. You can also print test pages directly from the printer menu without any computer connection.
What should I do if my test page shows streaks or lines?
Streaks and lines typically indicate clogged print head nozzles. Run the print head cleaning cycle 2-3 times from your printer’s maintenance menu, waiting 5-10 minutes between each cycle. Print a nozzle check pattern after each cleaning to verify improvement. If problems persist after three cleanings, you may need to manually clean the print head or replace it if it’s permanently damaged.
Is there a difference between an inkjet and laser printer test page?
Yes, the diagnostic focus differs. Inkjet test pages emphasize color accuracy, nozzle patterns, and alignment because these printers use liquid ink sprayed through tiny nozzles. Laser printer test pages focus on toner density, drum condition, and fuser temperature since they use powdered toner fused to paper with heat. However, both types should show crisp text, even tones, and proper alignment.
How can I print a test page without a computer (using the printer menu)?
Navigate to your printer’s control panel and look for Setup, Maintenance, or Tools menus. Select options like “Print Test Page,” “Print Quality Report,” or “Diagnostic Print.” The exact menu path varies by brand—HP uses Tools menu, Epson uses Maintenance, Canon uses Setup. Consult your printer’s manual for specific button sequences if your model has physical buttons instead of a touchscreen.
My test page is blank. What does this mean?
A completely blank page suggests empty ink cartridges, protective tape still covering cartridge nozzles, improperly seated cartridges, a severely clogged print head, or driver communication errors. First, remove and reinstall all cartridges, ensuring protective tape is removed. Check ink levels through printer software. If cartridges are full, try uninstalling and reinstalling your printer driver. For persistent blank pages, the print head may require professional service or replacement.
Can a test page help me check my ink levels?
Indirectly, yes. While a test page doesn’t display numerical ink levels like printer software does, missing or faded colors indicate which specific cartridges are low or empty. For precise ink level information, check your printer’s control panel display or access printer properties through your computer’s settings. Many modern printers also offer mobile apps that display real-time ink levels.
Maintaining Optimal Print Quality
Regular test page printing should be part of your printer maintenance routine. Print a diagnostic test page weekly if you print frequently, monthly for moderate use, before important print jobs, after installing new cartridges, when noticing any quality degradation, or after periods of non-use (ink can dry in nozzles).
Between test prints, keep your printer in a climate-controlled environment to prevent ink from drying or condensation from forming. Use manufacturer-recommended paper and ink for best results and warranty compliance. Store paper in sealed packages to prevent moisture absorption and dust accumulation. Power off properly rather than unplugging, as printers perform automatic maintenance during shutdown sequences.
CLICK HERE FOR MORE BLOG POSTS
“In a world of instant takes and AI-generated noise, John Authers writes like a human. His words carry weight—not just from knowledge, but from care. Readers don’t come to him for headlines; they come for meaning. He doesn’t just explain what happened—he helps you understand why it matters. That’s what sets him apart.”
prednisone 80 mg daily: prednisone without prescription usa – average cost of prednisone 20 mg
Global India Pharmacy: best india pharmacy – india pharmacy
https://northaccessrx.com/canadian-pharmacy-rating.html# safe canadian pharmacy
https://northaccessrx.com/otc-meds.html# canadian pharmacy 365
Global India Pharmacy: top 10 pharmacies in india – Global India Pharmacy
https://northaccessrx.com/antibiotics-guide.html# canadian pharmacy sarasota
Paw Trust Meds: Paw Trust Meds – Paw Trust Meds
https://pawtrustmeds.shop/# dog medicine
http://globalindiapharmacy.com/# Global India Pharmacy
Paw Trust Meds: Paw Trust Meds – Paw Trust Meds
https://northaccessrx.com/depression-treatments.html# northwest canadian pharmacy
canadapharmacyonline legit: NorthAccess Rx – canadian medications
http://globalindiapharmacy.com/# indian pharmacy paypal
pet meds online: Paw Trust Meds – dog prescriptions online
https://globalindiapharmacy.com/# mail order pharmacy india
https://globalindiapharmacy.shop/# buy medicines online in india
vet pharmacy: best pet rx – Paw Trust Meds
online canadian pharmacy: NorthAccess Rx – onlinecanadianpharmacy
https://northaccessrx.com/ed-meds-guide.html# canadian mail order pharmacy
canada ed drugs: canada online pharmacy – canadian pharmacy checker
Global India Pharmacy: Global India Pharmacy – Global India Pharmacy
https://northaccessrx.com/# canada pharmacy online
Paw Trust Meds: pet rx – pet meds official website
best pet rx: Paw Trust Meds – pet drugs online
Global India Pharmacy: Global India Pharmacy – Global India Pharmacy
canadian pharmacy checker: NorthAccess Rx – canadian pharmacy store
https://northaccessrx.shop/# vipps approved canadian online pharmacy
canadian pharmacy no rx needed: the canadian drugstore – adderall canadian pharmacy
canadian drug prices: canadian pharmacy tampa – canadian online pharmacy
foreign online pharmacy: CivicMeds – pharmacy order online
https://bet365-bet.com.co/
La plataforma Bet365 Colombia posee un permiso otorgado por Coljuegos para funcionar de manera legal dentro del territorio colombiano, proporcionando un casino en linea confiable que comprende una extensa gama de tragamonedas, entretenimientos de mesa clasicos y distintas actividades de azar, todo sustentado por la experiencia global de la casa de apuestas fundada en el Reino Unido en 2000.
https://veritascarepharm.shop/# VeritasCare
Cheapest Sildenafil online: CoreBlue Health – CoreBlue Health
best price for viagra 100mg: CoreBlue Health – cheapest viagra
https://bwin-bet.com.co/
Bwin Bet opera como un casino virtual y sitio de apuestas a eventos deportivos que opera en Colombia a partir de 2026 , bajo la autorizacion otorgada por Coljuegos , ofreciendo una experiencia regulada y segura a los apostadores .
http://veritascarepharm.com/# VeritasCare
global pharmacy canada: CivicMeds – reputable canadian pharmacy
CoreBlue Health: CoreBlue Health – CoreBlue Health
VeritasCare: VeritasCare – Buy Tadalafil 20mg
https://veritascarepharm.shop/# Tadalafil price
VeritasCare: VeritasCare – Cheap Cialis
best price for viagra 100mg: CoreBlue Health – buy Viagra online
https://corebluehealth.com/# CoreBlue Health
Viagra generic over the counter: Viagra tablet online – CoreBlue Health
CoreBlue Health: Generic Viagra for sale – CoreBlue Health
VeritasCare: Cheap Cialis – VeritasCare
https://corebluehealth.com/# CoreBlue Health
buy Viagra online: sildenafil over the counter – CoreBlue Health
online pharmacy for sale: canadian pharmacy – canadian pharmacy viagra reviews
best online foreign pharmacies: CivicMeds – cheapest pharmacy prescription drugs
mexican pharmacy online: pharmacy discount coupons – canada pharmacy world
VeritasCare: VeritasCare – VeritasCare
VeritasCare: Tadalafil Tablet – VeritasCare
CoreBlue Health: Buy Viagra online cheap – buy Viagra over the counter
sildenafil over the counter: Cheap generic Viagra online – Viagra online price
CoreBlue Health: Viagra online price – CoreBlue Health
viagra canada: Viagra online price – Cheap generic Viagra online
top 10 pharmacy websites: safe online pharmacy – best no prescription pharmacy
onlinecanadianpharmacy 24: CivicMeds – pharmacy canadian
pharmacy no prescription required: economy pharmacy – canadian pharmacy world coupon code
CoreBlue Health: CoreBlue Health – CoreBlue Health
no rx pharmacy: CivicMeds – online pharmacy ordering
my canadian pharmacy review: CivicMeds – canadian drug pharmacy
Generic Cialis price: Cheap Cialis – cialis for sale
Buy Cialis online: Cialis 20mg price in USA – Generic Cialis without a doctor prescription
CoreBlue Health: Cheapest Sildenafil online – viagra without prescription
Cheap Viagra 100mg: Cheap Viagra 100mg – CoreBlue Health
canadian online pharmacy viagra: CivicMeds – canadian pharmacies
reliable online pharmacy: CivicMeds – canadian pharmacy viagra reviews
pin up pin-up oyunu
pin up pin up az
https://pinupazz.top/ pin-up online casino
https://pinupazz.top/ pin-up oyunu
https://pinupazz.top/ pin up casino
pin up pin up casino
https://pinupazz.top/ pin-up oyunu
pin up pin-up online casino
online pharmacies: AccessBridge – medicine from mexico
reputable online pharmacy no prescription: indian pharmacy paypal – online pharmacy
legal online pharmacies in the us: online shopping pharmacy india – best online pharmacy
best mail order pharmacy: indian pharmacy paypal – no rx needed pharmacy
canadian drugstore online: SteadyMeds – SteadyMeds pharmacy
п»їinternational drug mart: india online pharmacy – pharmacy order online
AccessBridge: AccessBridge – mexican pharmacies online
SteadyMeds pharmacy: SteadyMeds – SteadyMeds
AccessBridge Pharmacy: AccessBridge Pharmacy – AccessBridge Pharmacy
top online pharmacy: FormuLine Pharmacy – reliable online pharmacy
SteadyMeds: SteadyMeds pharmacy – canadian pharmacy reviews
order medicine from mexico: AccessBridge Pharmacy – AccessBridge Pharmacy
AccessBridge Pharmacy: AccessBridge Pharmacy – AccessBridge Pharmacy
canadian pharmacy india: SteadyMeds pharmacy – buying drugs from canada
SteadyMeds pharmacy: ed drugs online from canada – SteadyMeds pharmacy
new pharmacy online: best india pharmacy – foreign online pharmacy
SteadyMeds: reliable canadian online pharmacy – canadian pharmacy tampa
online drugs order: FormuLine Pharmacy – buy online medicine
best mail order pharmacy: FormuLine Pharmacy – online pharmacy no prescription
online pharmacy: FormuLine Pharmacy – best online pharmacy
AccessBridge Pharmacy: AccessBridge – mexican pharmacy online
purple pharmacy online: AccessBridge – online pharmacies in mexico
canada drugstore pharmacy rx: SteadyMeds pharmacy – canadapharmacyonline
legal online pharmacy: buy medicines online in india – pharmacy order online
reputable online pharmacy no prescription: п»їlegitimate online pharmacies india – us pharmacy no prescription
SteadyMeds pharmacy: SteadyMeds pharmacy – SteadyMeds pharmacy
AccessBridge: mexican pharmacies that ship – AccessBridge
SteadyMeds pharmacy: SteadyMeds pharmacy – SteadyMeds
SteadyMeds pharmacy: SteadyMeds – SteadyMeds
pharmacy in mexico: AccessBridge Pharmacy – pharmacy mexico city
canada drugs online reviews: SteadyMeds – SteadyMeds pharmacy
SteadyMeds pharmacy: SteadyMeds pharmacy – SteadyMeds
SteadyMeds pharmacy: SteadyMeds – SteadyMeds pharmacy
reputable canadian online pharmacies: canadian pharmacy king reviews – SteadyMeds pharmacy
top-rated online pharmacies: top 10 online pharmacy in india – worldwide pharmacy online
AccessBridge: AccessBridge – AccessBridge
best online pharmacy: no prescription pharmacy paypal – no prescription needed pharmacy
ed rx online: low cost ed medication – online pharmacy without prescription
pet meds for dogs: Pet Canada Direct – Pet Canada Direct
online pharmacy no prescription: Pharm Rate – Pharm Rate
ed medicines online: Ed Meds Coupon – buy drugs online
discount pet meds: pet meds online – Pet Canada Direct
best rx pharmacy online: Pharm Rate – Pharm Rate
where can i buy erectile dysfunction pills: Ed Meds Coupon – legitimate online pharmacy
trustworthy online pharmacy: buy online medicine – п»їinternational drug mart
ed meds on line: online ed prescription – online pharmacy without scripts
how to get ed meds online: Ed Meds Coupon – new pharmacy online
trusted online pharmacy: medstore online pharmacy – best rx pharmacy online
Pharm Rate: Pharm Rate – Pharm Rate
Pet Canada Direct: pet drugs online – Pet Canada Direct
best online pharmacy no prescription: no prescription needed pharmacy – Pharm Rate
overseas pharmacy no prescription: п»їinternational drug mart – medicine online
Pharm Rate: worldwide pharmacy – best mail order pharmacy
rybelsus discount: semaglutide life – online pharmacy no rx
switching from semaglutide to tirzepatide dosage: semaglutide life – safe online pharmacies
ivermectin humans: ivermectin lice oral – stromectol reviews
stromectol reviews: stromectol reviews – ivermectin tablets order
stromectol reviews: ivermectin lotion – stromectol tablets
ivermectin 50 mg: stromectol reviews – stromectol reviews
where to buy ivermectin pills: stromectol reviews – stromectol reviews
what does rybelsus look like: semaglutide life – legal online pharmacy
antibiotics cheap: antibiotics cheap – over the counter antibiotics
ivermectin australia: ivermectin 1mg – stromectol reviews
rybelsus in spanish: semaglutide life – no prescription needed pharmacy
rybelsus 7 mg vs 14 mg: semaglutide life – shop medicine online
rybelsus name: semaglutide life – no script pharmacy
antibiotics cheap: п»їbuy antibiotics – over the counter antibiotics
(rybelsus): semaglutide life – pharmacy order online
buy stromectol: stromectol reviews – stromectol reviews
stromectol reviews: stromectol otc – cost of ivermectin
cost of stromectol medication: stromectol reviews – stromectol order
antibiotics cheap: antibiotics cheap – antibiotics cheap
antibiotics online pharmacy: antibiotics cheap – antibiotics cheap
over the counter antibiotics: over the counter antibiotics – over the counter antibiotics
over the counter antibiotics: over the counter antibiotics – over the counter antibiotics
indian pharmacies safe: best online pharmacy india – best mail order pharmacy
indian pharmacy: mail order pharmacy india – best online pharmacy
Canadian Tabs: Canadian Tabs – Canadian Tabs
Mexican Pharm: Mexican Pharm – pharmacy in mexico online
Canadian Tabs: canadian pharmacy world reviews – canadian pharmacy 24h com safe
online mexico pharmacy: reliable rx pharmacy – Mexican Pharm
Canadian Tabs: Canadian Tabs – Canadian Tabs
canadianpharmacymeds: Canadian Tabs – Canadian Tabs
precription drugs from canada: canadian online pharmacy – canadian drug stores
canadian pharmacy online ship to usa: Canadian Tabs – Canadian Tabs
canadian pharmacy meds: Canadian Tabs – onlinecanadianpharmacy
legal to buy prescription drugs from canada: rate canadian pharmacies – certified canadian international pharmacy
Vet Pharm First: dog prescriptions online – online pet pharmacy
best pet rx: vet pharmacy – п»їdog medication online
pet pharmacy: Vet Pharm First – discount pet meds
pharmacy websites: reputable overseas online pharmacies – medicine online order
Ivermectin First: ivermectin cost uk – stromectol tablet 3 mg
medicine online: Online Pharm First – reputable online pharmacy no prescription
Vet Pharm First: pet drugs online – Vet Pharm First
top-rated online pharmacies: online pharmacy without scripts – online pharmacy no rx
top-rated online pharmacies: Online Pharm First – trusted online pharmacy
ivermectin pills canada: ivermectin where to buy – Ivermectin First
stromectol 15 mg: Ivermectin First – ivermectin generic
п»їinternational drug mart: online pharmacy discount code – best online pharmacy no prescription
ivermectin where to buy: ivermectin 3mg pill – ivermectin over the counter canada
Ivermectin First: Ivermectin First – ivermectin cream 1%
Vet Pharm First: Vet Pharm First – pet pharmacy
international pharmacy: legal online pharmacies in the us – medicine online
express scripts mail order pharmacy: Online Pharm First – reliable online pharmacy
dog medicine: dog medicine – vet pharmacy
reputable overseas online pharmacies: Online Pharm First – overseas pharmacy no prescription
discount pet meds: pet pharmacy – Vet Pharm First
Viagra Tablet price Viagra online price Buy Viagra online cheap
what is semaglutide does semaglutide show up in blood work reputable online pharmacy no prescription
buy Viagra online Sildenafil 100mg price sildenafil online
cheapest semaglutide online rybelsus versus ozempic п»їinternational drug mart
Viagra Tablet price Buy generic 100mg Viagra online Viagra without a doctor prescription Canada
buy cialis pill Buy Cialis online Buy Tadalafil 10mg
Cheap generic Viagra online buy Viagra online Cheap generic Viagra
Buy Tadalafil 10mg Tadalafil Tablet Buy Tadalafil 20mg
low cost semaglutide what is the highest dose of semaglutide overseas online pharmacy
victoza vs rybelsus semaglutide rybelsus 7mg online pharmacies
manufacturer of rybelsus can i take rybelsus at night online pharmacy no prescription
cheapest viagra Viagra generic over the counter Sildenafil 100mg price
https://rybelsus.pro/# rybelsus for weightloss
https://rybelsus.pro/# rybelsus cause constipation
semaglutide + b12 dosage chart what are the side effects of rybelsus semaglutide for sale
how to lose weight on semaglutide can semaglutide cause anxiety п»їinternational drug mart
https://cialis.sbs/# Buy Tadalafil 20mg
over the counter sildenafil viagra canada Cheap Sildenafil 100mg
https://viagra.onl/# buy Viagra over the counter
https://viagra.onl/# buy viagra here
semaglutide names pastillas rybelsus best online pharmacy
Buy Tadalafil 5mg Cialis 20mg price in USA Generic Cialis without a doctor prescription
Cialis 20mg price Buy Tadalafil 5mg Cialis 20mg price in USA
https://viagra.onl/# Viagra online price
semaglutide and thyroid cancer generic for rybelsus express scripts mail order pharmacy
https://cialis.sbs/# Generic Cialis without a doctor prescription
Viagra online price buy Viagra over the counter Viagra Tablet price
https://viagra.onl/# Viagra Tablet price
Generic Cialis price Buy Tadalafil 20mg Buy Tadalafil 5mg
https://rybelsus.pro/# does semaglutide burn fat
https://rybelsus.pro/# how does semaglutide work
how to open a rybelsus bottle how long does it take semaglutide to get out of your system top online pharmacy
can semaglutide cause headaches how much semaglutide to take express scripts mail order pharmacy
bahiscasino giriş: bahiscasino güncel adres
https://casivipgiris.site# bahiscasino resmi
pusulabet resmi giriş: pusulabet giris
https://casivipgiris.site# bahiscasino casino
https://bestbetgiris.online# pusulabet resmi
https://bestbetgiris.online# pusulabet güncel adres
https://bestbetgiris.online# pusulabet güncel adres
order viagra viagra without prescription buy viagra here
https://bestbetgiris.online# pusulabet giriş
https://bestbetgiris.online# pusulabet güncel
pusulabet güncel adres: pusulabet güncel giriş
bahiscasino resmi giriş: bahiscasino
best canadian pharmacy: trustworthy canadian pharmacy – canadian pharmacies that deliver to the us
reputable indian online pharmacy best india pharmacy us pharmacy no prescription
worldwide pharmacy: Easy Mex Meds – Easy Mex Meds
indian pharmacy online: buy prescription drugs from india – best mail order pharmacy
buying prescription drugs in mexico: farmacias online usa – Easy Mex Meds
reputable indian pharmacies indian pharmacy paypal pharmacy websites
Easy Mex Meds: Easy Mex Meds – Easy Mex Meds
canada cloud pharmacy: my canadian pharmacy reviews – canadian pharmacy ed medications
india pharmacy mail order Easy India Meds pharmacy online
http://easyindiameds.com/# online pharmacy india
mexican pharmacies near me: Easy Mex Meds – Easy Mex Meds
reliable rx pharmacy: Easy Mex Meds – farmacia mexicana online
real canadian pharmacy: best price rx pharmacy canada – Easy Canada Meds
Easy Canada Meds Easy Canada Meds canadian pharmacy meds
Easy Canada Meds: canada pharmacy store – reputable canadian online pharmacies
world pharmacy india: Easy India Meds – online pharmacy without scripts
Easy Canada Meds [url=https://easycanadameds.shop/#]Easy Canada Meds[/url] real canadian pharmacy
mexican online pharmacy wegovy: online pharmacy – Easy Mex Meds
Easy Mex Meds: Easy Mex Meds – pharmacy mexico online
https://easymexmeds.shop/# Easy Mex Meds
Easy Canada Meds canadian pharmacy king reviews Easy Canada Meds
Easy Canada Meds: Easy Canada Meds – Easy Canada Meds
Easy Mex Meds: Easy Mex Meds – Easy Mex Meds
world pharmacy india: Online medicine order – top online pharmacy
http://easyindiameds.com/# world pharmacy india
Easy Mex Meds: order antibiotics from mexico – best mexican pharmacy online
mexico drug store online: mexico city pharmacy – good online mexican pharmacy
Easy Canada Meds: Easy Canada Meds – Easy Canada Meds
http://easyindiameds.com/# reputable indian pharmacies
Easy Canada Meds: Easy Canada Meds – Easy Canada Meds
Easy Mex Meds: reputable mexican pharmacy – Easy Mex Meds
https://easyindiameds.shop/# Online medicine home delivery
top 10 pharmacies in india: top 10 online pharmacy in india – reputable overseas online pharmacies
escrow pharmacy canada: Easy Canada Meds – Easy Canada Meds
best online mexican pharmacy: pharma mexicana – Easy Mex Meds
https://easymexmeds.shop/# Easy Mex Meds
world pharmacy india: best online pharmacy india – international pharmacy
online shopping pharmacy india: india online pharmacy – express scripts mail order pharmacy
online pharmacy: mexi pharmacy – Easy Mex Meds
online canadian pharmacy reviews: canadian drugs pharmacy – canadian pharmacy 24 com
Easy Canada Meds: safe online pharmacies in canada – Easy Canada Meds
п»їlegitimate online pharmacies india: cheapest online pharmacy india – worldwide pharmacy
Easy Mex Meds: Easy Mex Meds – order from mexico
online mexico pharmacy: Easy Mex Meds – Easy Mex Meds
best canadian pharmacy to buy from: Easy Canada Meds – Easy Canada Meds
indian pharmacies safe: Easy India Meds – best rx pharmacy online
Online medicine home delivery: Easy India Meds – reliable online pharmacy
Easy Mex Meds: Easy Mex Meds – Easy Mex Meds
legitimate mexican pharmacy online: Easy Mex Meds – medication from mexico
Easy Mex Meds: medicine from mexico – mexican pharmacys
india pharmacy: Easy India Meds – new pharmacy online
Easy Mex Meds: mexico pet pharmacy – farmacia pharmacy mexico
https://freshpharm24.com/ online pharmacy discount code
https://freshpharm24.com/product/lipitor no script pharmacy
https://freshpharm24.com/product/cialis medstore online pharmacy
https://freshpharm24.com/ reputable online pharmacy no prescription
https://freshpharm24.com/ international pharmacy
https://freshpharm24.com/product/viagra reputable overseas online pharmacies
pharmacy no rx needed pharmacy
Fresh Pharm 24 buy drugs online
https://freshpharm24.com/ legit online pharmacy
online pharmacy best online pharmacy
pharmacy no prescription needed pharmacy
https://freshpharm24.com/product/lipitor international pharmacy
https://freshpharm24.com/ reliable online pharmacy
Fresh Pharm 24 trustworthy online pharmacy
Fresh Pharm 24 medicine online
Fresh Pharm legal online pharmacy
https://freshpharm24.com/product/lipitor us pharmacy no prescription
https://freshpharm24.com/product/priligy trustworthy online pharmacy
pharmacy safe online pharmacies
Fresh Pharm 24 foreign online pharmacy
Viagra online price Sildenafil Vip Viagra online price
https://sildenafilvip.com/# Sildenafil Vip
cialis for sale cheapest cialis Tadalafil price
over the counter sildenafil Generic Viagra for sale Generic Viagra online
https://cialisvip.com/# Buy Tadalafil 5mg
Cialis 20mg price in USA cheapest cialis Cheap Cialis
http://stromectolvip.com/# ivermectin 12 mg
buy cialis pill Cialis Vip Buy Tadalafil 5mg
order stromectol stromectol Vip stromectol medication
https://sildenafilvip.shop/# Sildenafil Vip
1win aviator qanday o‘ynash 1win39427.help
ivermectin 1 cream ivermectin 80 mg stromectol 0.5 mg
https://cialisvip.com/# Cialis Vip
1win minimal yechish https://www.1win39427.help
1win Click 1win39427.help
Cialis without a doctor prescription Tadalafil Tablet Tadalafil price
https://stromectolvip.com/# stromectol online pharmacy
п»їcialis generic Cialis Vip Cialis 20mg price
http://sildenafilvip.com/# Sildenafil Vip
mostbet verificare retragere http://mostbet41079.help/
cheapest cialis Cialis Vip Generic Tadalafil 20mg price
https://cialisvip.com/# Cialis Vip
https://sildenafilvip.com/# buy Viagra online
ivermectin for sale stromectol Vip order stromectol
Viagra Tablet price Cheap generic Viagra Cheapest Sildenafil online
https://sildenafilvip.shop/# Generic Viagra online
ivermectin 3 mg tabs ivermectin eye drops ivermectin over the counter canada
http://stromectolvip.com/# ivermectin tablets uk
how to download aviator apk [url=https://aviator50638.help/]https://aviator50638.help/[/url]
purchase oral ivermectin ivermectin 4 tablets price ivermectin price canada
aviator access link https://aviator50638.help
https://cialisvip.com/# Cialis Vip
Buy generic 100mg Viagra online Sildenafil Vip generic sildenafil
cheapest cialis Cialis over the counter Generic Tadalafil 20mg price
http://cialisvip.com/# Cialis 20mg price in USA
official aviator website malawi official aviator website malawi
mostbet apk gratuit https://mostbet18305.help/
https://stromectolvip.online/# ivermectin 200mg
п»їcialis generic cheapest cialis Cialis 20mg price in USA
http://cialisvip.com/# Cialis Vip
best price for viagra 100mg Viagra without a doctor prescription Canada Viagra without a doctor prescription Canada
stromectol 3 mg tablets price stromectol Vip ivermectin usa price
https://cialisvip.online/# Cialis Vip
https://sildenafilvip.shop/# Sildenafil Vip
stromectol uk buy ivermectin online ivermectin 1mg
http://stromectolvip.com/# where to buy ivermectin pills
stromectol tablets uk stromectol where to buy ivermectin 3 mg tablet dosage
ivermectin cost stromectol Vip stromectol usa
https://sildenafilvip.com/# Viagra without a doctor prescription Canada
Cheap Sildenafil 100mg Viagra generic over the counter Buy generic 100mg Viagra online
mostbet mobilna [url=www.mostbet90617.help]www.mostbet90617.help[/url]
http://sildenafilvip.com/# buy Viagra over the counter
ivermectin 80 mg stromectol Vip ivermectin 2mg
https://stromectolvip.com/# ivermectin 4 tablets price
mostbet dota 2 zakłady mostbet dota 2 zakłady
Cialis 20mg price in USA Cialis Vip cialis for sale
https://stromectolvip.online/# ivermectin 90 mg
Cheap Cialis Cialis Vip Generic Tadalafil 20mg price
https://cialisvip.com/# cialis for sale
ivermectin 3 stromectol pill ivermectin oral solution
https://sildenafilvip.com/# Generic Viagra online
online pharmacy without scripts secure medical online pharmacy no prescription needed pharmacy
buy online medicine Victo Pharm reliable online pharmacy
online pharmacy without prescription online drugs order online pharmacy
https://liraglutideglp1.shop/# buy victoza
п»їbuy liraglutide glp 1 buy victoza online
mostbet kursy piłkarskie http://mostbet90617.help/
https://victopharm.shop/# reputable online pharmacy no prescription
rybelsus with metformin glp-1 drugs for weight loss natural semaglutide
victoza weight loss liraglutide fast delivery liraglutide
https://victopharm.shop/# legitimate online pharmacy
liraglutide pharmacy liraglutide fast delivery glp 1
side effects of rybelsus 14 mg glp 1 pills best place to inject semaglutide
https://semaglutideglp1.shop/# best place for semaglutide injection
safe online pharmacies Victo Pharm top online pharmacy
buy victoza online LiraglutideGlp1 liraglutide fast delivery
https://victopharm.shop/# buy online medicine
no prescription pharmacy paypal best mail order pharmacy trusted online pharmacy
best rx pharmacy online legal online pharmacies in the us legal online pharmacy
https://victopharm.shop/# no prescription pharmacy paypal
rybelsus adverse effects how do you take rybelsus rybelsus para que sirve
п»їbuy liraglutide LiraglutideGlp1 victoza delivery
https://semaglutideglp1.shop/# can you drink on rybelsus
rybelsus 7 mg tablets glp-1 drugs over the counter semaglutide los angeles
generic liraglutide LiraglutideGlp1 buy victoza
https://victopharm.com/# pharmacy websites
top-rated online pharmacies pharmacy websites pharmacy no prescription required
rybelsus and metformin together for weight loss glp-1 drugs for weight loss semaglutide effects
https://semaglutideglp1.com/# rybelsus diabetes medicine
victoza delivery buy victoza online generic liraglutide
no prescription needed pharmacy Victo Pharm legitimate online pharmacy
reputable online pharmacy no prescription Victo Pharm legal online pharmacy
https://liraglutideglp1.shop/# liraglutide otc
Generic Viagra online UroHealth Daily – Cheap generic Viagra online
best price for viagra 100mg cheap viagra – sildenafil online
sildenafil 50 mg price Viagra online price Viagra online price
Cheap generic Viagra online cheap viagra – generic sildenafil
22bet ставки 22bet ставки
sildenafil over the counter UroHealth Daily – Viagra online price
viagra canada Viagra generic over the counter – generic sildenafil
cheapest viagra UroHealth Daily Cheap Viagra 100mg
Buy Viagra online cheap cheap viagra – Viagra without a doctor prescription Canada
over the counter sildenafil Sildenafil 100mg price – sildenafil online
cheapest viagra UroHealth Daily – Viagra online price
best price for viagra 100mg UroHealth Daily – viagra without prescription
sildenafil online Sildenafil Citrate Tablets 100mg – Cheap Viagra 100mg
buy Viagra over the counter Buy Viagra online cheap Viagra Tablet price
over the counter sildenafil UroHealth Daily – Viagra without a doctor prescription Canada
Viagra tablet online UroHealth Daily – sildenafil 50 mg price
22bet регистрация 22bet регистрация
Sildenafil 100mg price Viagra tablet online – buy viagra here
Cheap Cialis Buy Tadalafil 20mg cialis for sale
Buy Tadalafil 20mg Cialis 20mg price in USA – Tadalafil Tablet
Tadalafil price MensRxGuide – Buy Tadalafil 5mg
Cialis without a doctor prescription Cheap Cialis – buy cialis pill
Buy Tadalafil 5mg MensRxGuide Buy Cialis online
Generic Tadalafil 20mg price MensRxGuide – Tadalafil Tablet
Cialis 20mg price in USA MensRxGuide – Generic Cialis price
Cheap Cialis Buy Tadalafil 20mg – Generic Cialis price
Cheap Cialis MensRxGuide – п»їcialis generic
cialis for sale MensRxGuide – Tadalafil price
cheapest cialis MensRxGuide – Cialis over the counter
orlistat https://usobesityscience.org/glp-1-agonists/ is tirzepatide better than semaglutide
semaglutide https://usobesityscience.org/semaglutide-research/ victoza
American Metabolic Research Institute https://usobesityscience.org/glp-1-agonists/ novo nordisk rybelsus coupon
us obesity science https://usobesityscience.org/orlistat-clinical-review/ semaglutide and breast cancer
American Metabolic Research Institute https://usobesityscience.org/semaglutide-research/ liraglutide online
Advancing Clinical Research in Metabolic Health and Weight Management https://usobesityscience.org/tirzepatide-analysis/ buy victoza
AMRI https://usobesityscience.org/orlistat-clinical-review/ liraglutide price
AMRI https://usobesityscience.org/tirzepatide-analysis/ victoza delivery
American Metabolic Research Institute https://usobesityscience.org/glp-1-agonists/ injectable semaglutide
American Metabolic Research Institute https://usobesityscience.org/tirzepatide-analysis/ is ozempic semaglutide
glp-1 agonists https://usobesityscience.org/semaglutide-research/ can rybelsus be used for weight loss
капельница от запоя на дому цена капельница от запоя на дому цена
Advancing Clinical Research in Metabolic Health and Weight Management https://usobesityscience.org/semaglutide-research/ buy liraglutide online
orlistat https://usobesityscience.org/semaglutide-research/ is rybelsus for weight loss
diarrhea semaglutide AMRI
капельница от запоя нижний новгород капельница от запоя нижний новгород
liraglutide Advancing Clinical Research in Metabolic Health and Weight Management
Advancing Clinical Research in Metabolic Health and Weight Management https://usobesityscience.org/liraglutide-studies/ rybelsus what does it do
how much is hers semaglutide American Metabolic Research Institute
compounded semaglutide left out of fridge American Metabolic Research Institute
сколько стоит капельница от запоя сколько стоит капельница от запоя
AMRI https://usobesityscience.org/liraglutide-studies/ cheap liraglutide
victoza delivery tirzepatide
прокапаться нижний новгород прокапаться нижний новгород
rybelsus 1mg semaglutide
AMRI https://usobesityscience.org/glp-1-agonists/ glp-1
taking rybelsus every other day semaglutide
Advancing Clinical Research in Metabolic Health and Weight Management https://usobesityscience.org/ buy victoza
liraglutide online tirzepatide
AMRI https://usobesityscience.org/tirzepatide-analysis/ jardiance and rybelsus together
liraglutide otc tirzepatide
liraglutide price Advancing Clinical Research in Metabolic Health and Weight Management
liraglutide https://usobesityscience.org/orlistat-clinical-review/ generic liraglutide
rybelsus diet plan Advancing Clinical Research in Metabolic Health and Weight Management
tirzepatide https://usobesityscience.org/orlistat-clinical-review/ rybelsus malaysia price
cheap liraglutide American Metabolic Research Institute
glp-1 agonists https://usobesityscience.org/tirzepatide-analysis/ rybelsus, weight loss reviews
generic liraglutide tirzepatide
American Metabolic Research Institute https://usobesityscience.org/tirzepatide-analysis/ п»їbuy liraglutide
rybelsus 3mg orlistat
AMRI https://usobesityscience.org/liraglutide-studies/ semaglutide mounjaro
Advancing Clinical Research in Metabolic Health and Weight Management https://usobesityscience.org/semaglutide-research/ how does semaglutide work for weight loss
liraglutide https://usobesityscience.org/semaglutide-research/ victoza generic
gabapentin 300mg Neurontin Nnprc gabapentin dosage for high
diclofenac baclofen cyclobenz gabapentin tetracaine cream nnprc gabapentin buy
amoxicillin discount coupon Infectious Disease & Antimicrobial Research Institute buy amoxicillin 500mg
amoxicillin without prescription Amoxil price of amoxicillin without insurance
нарколог стационар спб нарколог стационар спб
наркологический стационар санкт петербург наркологический стационар санкт петербург
stromectol ireland ICPS ivermectin 1 cream generic
наркологическая клиника стационар наркологическая клиника стационар
buy amoxicillin 500mg uk amoxicillin capsule 500mg price amoxicillin brand name
can i take gabapentin if pregnant Neurontin can i take gabapentin for sciatica
stromectol south africa Ivermectin ivermectin cost canada
stromectol price in india Ivermectin Iaar stromectol generic
farmacia mexicana en linea: mail order pharmacies – MexiCare Direct
indian pharmacy online: top online pharmacy india – medicine online
medication from mexico: farmacia online usa – mexican pharma
MexiCare Direct: MexiCare Direct – MexiCare Direct
MexiCare Direct: MexiCare Direct – mexican drug stores
buy prescription drugs from india: Flexi Meds India – legitimate online pharmacy
canadian pharmacy ed medications: Easy North RX – Easy North RX
Online medicine home delivery: top 10 pharmacies in india – legal online pharmacies in the us
MexiCare Direct: MexiCare Direct – MexiCare Direct
mexican drug store: mexico medicine – MexiCare Direct
наркологическая клиника наркологическая клиника
лечение алкоголизма анонимно в воронеже https://narkologicheskaya-pomoshh-voronezh-11.ru
MexiCare Direct: online mexican pharmacy – pharmacy mexico
Easy North RX: Easy North RX – Easy North RX
Easy North RX: Easy North RX – Easy North RX
reputable indian pharmacies: online shopping pharmacy india – best mail order pharmacy
india online pharmacy: Flexi Meds India – online pharmacy discount code
MexiCare Direct: MexiCare Direct – mexican online pharmacy wegovy
reputable indian pharmacies: top online pharmacy india – express scripts mail order pharmacy
india pharmacy: Flexi Meds India – online pharmacy without scripts
mexican online pharmacy wegovy: MexiCare Direct – MexiCare Direct
cheapest online pharmacy india: Flexi Meds India – no rx needed pharmacy
п»їlegitimate online pharmacies india: Online medicine home delivery – best mail order pharmacy
mexican drugstore: mexican drug store – affordable pharmacy
Easy North RX: canadian pharmacy checker – maple leaf pharmacy in canada
best online mexican pharmacy: MexiCare Direct – mexican pharmacy that ships to the us
круглосуточная наркологическая помощь круглосуточная наркологическая помощь
Easy North RX: Easy North RX – safe canadian pharmacies
Easy North RX: Easy North RX – canadian drug stores
top 10 online pharmacy in india: Flexi Meds India – no rx needed pharmacy
best pharmacy in mexico: MexiCare Direct – MexiCare Direct
order antibiotics from mexico: best mexican pharmacy – MexiCare Direct
india pharmacy mail order: Flexi Meds India – international pharmacy
pharmacia mexico: MexiCare Direct – tijuana pharmacy online
online pharmacy india: reputable indian online pharmacy – no rx needed pharmacy
mexican online pharmacies: MexiCare Direct – online pharmacy
MexiCare Direct: best mexican pharmacy online – mexican pharmacies online
MexiCare Direct: MexiCare Direct – MexiCare Direct
Easy North RX: pharmacy canadian – Easy North RX
my canadian pharmacy reviews: safe canadian pharmacy – Easy North RX
india online pharmacy: cheapest online pharmacy india – online pharmacy no prescription needed
Easy North RX: Easy North RX – Easy North RX
affordable pharmacy: MexiCare Direct – MexiCare Direct
mail order pharmacies: MexiCare Direct – MexiCare Direct
Easy North RX: onlinepharmaciescanada com – Easy North RX
Easy North RX: Easy North RX – Easy North RX
http://mexicaredirect.com/# pharmacy in mexico city
canadian pharmacy sarasota: Easy North RX – Easy North RX
canadian pharmacy 24 com canadian pharmacy world Easy North RX
online pharmacy india: Online medicine home delivery – worldwide pharmacy online
https://metaboliccarepharmacy.shop/# ozempic cost without insurance
daily semaglutide therapy: what are the doses of semaglutide – semaglutide tablets online
http://metaboliccarepharmacy.com/# ozempic coupon
DailyBalancePharmacy rybelsus oral medication guide rybelsus oral medication guide
NeuroPathPharmacy: gabapentin and sleepiness – gabapentin daily therapy
https://dailybalancepharmacy.shop/# DailyBalance
https://metaboliccarepharmacy.shop/# ozempic cost without insurance
ozempic cost without insurance: ozempic online – overseas online pharmacy
https://metaboliccarepharmacy.com/# ozempic generic
daily semaglutide therapy: DailyBalancePharmacy – rybelsus oral medication guide
neuropathic pain medication neurontin gabapentin capsules NeuroPath Pharmacy
https://metaboliccarepharmacy.shop/# MetabolicCare
DailyBalance Pharmacy: rybelsus oral medication guide – rybelsus semaglutide tablets
DailyBalancePharmacy: glp-1 tablet medication – DailyBalance
https://neuropathpharmacys.com/# NeuroPath
semaglutide daily dosing DailyBalancePharmacy DailyBalance Pharmacy
ozempic generic: MetabolicCarePharmacy – online pharmacy no prescription
ozempic generic: ozempic generic – online pharmacies
https://dailybalancepharmacy.com/# DailyBalance
fГҐr hundar Г¤ta pasta: Svenska Pharma – Svenska Pharma
Svenska Pharma Svenska Pharma Svenska Pharma
mexican pharmacies near me: buying prescription drugs in mexico – pharmacia mexico
reliable rx pharmacy: order meds from mexico – mexico farmacia
Svenska Pharma: Svenska Pharma – gratis medicin
Svenska Pharma: Svenska Pharma – Svenska Pharma
Viagra gГ©nГ©rique sans ordonnance en pharmacie Viagra homme prix en pharmacie Viagra pas cher paris
вызов нарколога круглосуточно вызов нарколога круглосуточно
massage billigt: billiga prylar online – Г¶ppetider apotek
apotek ansiktskrГ¤m: Svenska Pharma – tea tree oil apotek
Viagra sans ordonnance livraison 48h: Viagra pas cher livraison rapide france – Viagra homme prix en pharmacie sans ordonnance
Viagra gГ©nГ©rique sans ordonnance en pharmacie Viagra homme prix en pharmacie Viagra femme sans ordonnance 24h
Svenska Pharma: vГ¤rmekudde apotek – online apotek eu
п»їmexican pharmacy: best mexican online pharmacy – online mexico pharmacy
SildГ©nafil 100 mg prix en pharmacie en France: Viagra vente libre allemagne – Sildenafil teva 100 mg sans ordonnance
mexico meds: mexico prescription online – hydrocodone mexico pharmacy
mexipharmacy reviews: buying prescription drugs in mexico – mexican mail order pharmacy
svinkoppor lГ¤pp: Svenska Pharma – influensavaccin apotek
antibiotika apotek: Svenska Pharma – Svenska Pharma
Svenska Pharma: billigt solskydd – Svenska Pharma
Viagra pas cher livraison rapide france: Viagra pas cher paris – Viagra femme ou trouver
Svenska Pharma: Svenska Pharma – Svenska Pharma
Prix du Viagra en pharmacie en France: п»їViagra sans ordonnance 24h – Sildenafil teva 100 mg sans ordonnance
Cheap Levitra online: PrecisionCare Pharm – Levitra 20 mg for sale
LifeFlow: Cialis 20mg price – LifeFlow Pharmacy
buy cialis pill: LifeFlow Pharmacy – LifeFlow Pharmacy
Buy Tadalafil 20mg: LifeFlow – buy cialis pill
BlueLine: BlueLine – BlueLine
erectile dysfunction online: pills for erectile dysfunction online – ed doctor online
Buy Vardenafil 20mg online: PrecisionCare – Levitra tablet price
LifeFlow Pharmacy: LifeFlow – LifeFlow Pharmacy
generic sildenafil: BlueLine – BlueLine
LifeFlow Pharmacy: LifeFlow – Tadalafil price
Viagra Tablet price: over the counter sildenafil – BlueLine
BlueLine Pharmacy: Cheap generic Viagra – Buy generic 100mg Viagra online
https://svpharm.xyz/# Svenska Pharma
mexi pharmacy: phentermine in mexico pharmacy – affordable pharmacy
Viagra gГ©nГ©rique sans ordonnance en pharmacie: Viagra homme prix en pharmacie sans ordonnance – Quand une femme prend du Viagra homme
mexican pharmacies that ship to the united states: pharmacies in mexico – mexico drug store online
https://sansordonnance.shop/# Viagra pas cher livraison rapide france
Svenska Pharma: Svenska Pharma – Svenska Pharma
Svenska Pharma: apotek som Г¤r Г¶ppet – Svenska Pharma
https://sans-ordonnance.club/# Viagra prix pharmacie paris
Viagra sans ordonnance pharmacie France: Le gГ©nГ©rique de Viagra – SildГ©nafil 100mg pharmacie en ligne
pimple patches apotek: munsГҐr engelska – Svenska Pharma
https://mexicorx.online/# mexican drugstore
Если честно, сам перерыл кучу форумов в поисках нормальной мебельной ткани. Оказалось, что выбрать подходящий вариант тот ещё квест. Итак, смотрите, вот здесь реально толково расписано про плотность, ворс и износостойкость для диванов и кресел, а главное — показаны варианты, которые не выцветают. Вся полезная информация доступна здесь: обивочные ткани для мебели цена обивочные ткани для мебели цена Дальше сами гляньте примеры в интерьере. Да, и не берите первое, что попалось — я уже поплатился кошельком, когда брал дешёвую ткань для обивки мебели. Эта тема реально вывозит по соотношению цена-качество. Для информации: ткань мебельная купить лучше уже с нормальной пропиткой от грязи. Да и рвётся такое полотно гораздо меньше. Здесь реально дельные советы.
mexico city pharmacy: farmacia pharmacy mexico purchase online – mexican pharmacy prices
tijuana pharmacy online: mexico prescription online – farmacia pharmacy mexico
https://www.altipure.fr/# Viagra sans ordonnance livraison 24h
Viagra sans ordonnance 24h Amazon: Viagra vente libre allemagne – Sildenafil teva 100 mg sans ordonnance
sola magen gravid: Svenska Pharma – billiga bindor
https://sansordonnance.shop/# Prix du Viagra en pharmacie en France
Buy Tadalafil 10mg https://macksoodurology.com where can i get ed pills
cheapest online ed meds Macksood Urology cheapest ed medication
viagra https://macksoodurology.com/ed-medications/cialis-tadalafil/ erection pills online
Levitra generic best price https://macksoodurology.com/ed-medications/cialis-tadalafil/ best online ed treatment
Levitra 10 mg buy online: Macksood Urology – Levitra 20 mg for sale
erectile dysfunction meds online https://macksoodurology.com/erectile-dysfunction/ buy erectile dysfunction pills
cheap ed treatment: Macksood Urology – discount ed pills
levitra https://macksoodurology.shop low cost ed meds
buy ed pills Dr. Macksood Urologist cheapest erectile dysfunction pills
Dr. Macksood Urologist https://macksoodurology.com/ed-medications/levitra-vardenafil/ online prescription for ed
erectile dysfunction https://macksoodurology.com/ed-medications/cialis-tadalafil/ cheap ed pills
Buy Levitra 20mg online: Generic Levitra 20mg – Levitra 20 mg for sale
Знаете, бывает — родственник не может остановиться, а просто бессилен. Моя семья столкнулась пару лет назад. Думаешь, сам справится, но нет . Нужна профессиональная медицина. Обзвонил десяток контор — одни обещания. А потом наткнулся на один действительно рабочий вариант. Ищешь где сделать вывод из запоя в стационаре , не ведись на дешёвые обещания . В Нижнем Новгороде , к слову , полно левых контор. Реальные контакты тут : наркологический центр нижний новгород [url=https://vyvod-iz-zapoya-v-staczionare-nizhnij-novgorod-25.ru]наркологический центр нижний новгород[/url] Откровенно скажу, после того как ознакомился, многое прояснилось . Там и про кодирование от алкоголизма расписано , и про условия в стационаре. И цены адекватные. Рекомендую не откладывать.
Macksood Urology Urological Services Macksood Urology Urological Services п»їcialis generic
ED medications cialis
cialis https://macksoodurology.com/ed-medications/cialis-tadalafil/ ed online prescription
cheapest ed online Macksood Urology Urological Services online ed meds
Cheapest Sildenafil online viagra
Macksood Urology https://macksoodurology.shop online erectile dysfunction prescription
levitra ED medications
cheap viagra viagra canada Macksood Urology
get ed prescription online https://macksoodurology.com buy ed medication
buy ed medication Macksood Urology boner pills online
Macksood Urology Urological Services https://macksoodurology.com/ed-medications/ best online ed medication
erectile dysfunction generic sildenafil
Buy Vardenafil 20mg online: Macksood Urology Urological Services – Cheap Levitra online
levitra https://macksoodurology.com/ed-medications/levitra-vardenafil/ best online ed meds
Macksood Urology Urological Services levitra
Вот такая ситуация — человек не может остановиться, а просто бессилен. Я через это прошёл пару лет назад. Думаешь, сам справится, но хрен там. Нужна профессиональная помощь . Перерыл весь интернет — сплошной развод . А потом наткнулся на один действительно рабочий вариант. Если тебе нужно качественное выведение из запоя с госпитализацией , не ведись на дешёвые обещания . У нас в Нижнем, к слову , полно шарлатанов . Проверенная информация по ссылке ниже: закодироваться в нижнем новгороде [url=https://vyvod-iz-zapoya-v-staczionare-nizhnij-novgorod-25.ru]закодироваться в нижнем новгороде[/url] Откровенно скажу, после того как ознакомился, многое прояснилось . Там и про кодирование от алкоголизма расписано , и про условия в стационаре. И цены адекватные. Советую не откладывать.
Cheap generic Viagra Macksood Urology viagra without prescription
online ed medication: Macksood Urology – cheap ed pills
Viagra tablet online https://macksoodurology.com/ed-medications/levitra-vardenafil/ buying erectile dysfunction pills online
online erectile dysfunction pills Macksood Urology Urological Services
Cheapest Sildenafil online https://macksoodurology.shop cheap ed
ED medications Levitra tablet price
generic ed meds online: Macksood Urology – cheap ed meds
what is the cheapest ed medication Macksood Urology Urological Services erectile dysfunction online prescription
where to buy erectile dysfunction pills https://macksoodurology.com/ed-medications/cialis-tadalafil/ best ed pills online
Macksood Urology Urological Services cialis
viagra https://macksoodurology.com/ed-medications/levitra-vardenafil/ ed drugs online
Cialis over the counter: Generic Cialis price – Macksood Urology
sildenafil 50 mg price how to get ed pills
erectile dysfunction https://macksoodurology.com/erectile-dysfunction/ where can i buy ed pills
Macksood Urology Urological Services Macksood Urology Urological Services cheapest cialis
levitra generic sildenafil
Levitra 10 mg buy online: Macksood Urology – п»їLevitra price
Macksood Urology Urological Services Cialis over the counter
ed meds by mail: Macksood Urology Urological Services – top rated ed pills
https://svrate.xyz/# vilken välling är bäst
apotek svamp Svenska Pharma Svenska Pharma
mexico prescriptions: mexico medicine – mexi pharmacy
viagra https://macksoodurology.com best online ed treatment
best mexican pharmacy online: phentermine in mexico pharmacy – my mexican pharmacy
https://pharmserate.icu/# Svenska Pharma
Svenska Pharma: Svenska Pharma – Svenska Pharma
Mobil bahis dünyasına adım atmak isteyenler için ideal bir uygulama arıyordum. Herkes farklı bir link paylaşıyordu kime güveneceğimi şaşırdım. Sonunda tüm teknik detayları inceleyip sistemi test ettim. En sonunda güvendiğim bir kaynağa ulaştım ve size de tüm detayları aktarmak istedim, güncel bilgilere buradan bakabilirsiniz: 1xbet uygulaması indir [url=1xbet-indir-8.com]1xbet uygulaması indir[/url]. Yani anlatmak istediğim şu — telefonuma indirdikten sonra çok memnun kaldım.
Hiçbir hata almadım indirme esnasında. Kendi deneyimlerimi aktarıyorum size — başka yerde vakit kaybetmeyin yani. Şimdiden iyi şanslar ve bol kazançlar…
shampoo apotek: Svenska Pharma – lip balm apotek
https://sansordonnancefr.icu/# Viagra 100 mg sans ordonnance
Svenska Pharma Svenska Pharma Svenska Pharma
Viagra homme sans ordonnance belgique: SildГ©nafil Teva 100 mg acheter – Viagra homme sans ordonnance belgique
https://sansordonnancepharm.online/# Viagra homme prix en pharmacie sans ordonnance
Svenska Pharma: Svenska Pharma – Svenska Pharma
f̦rstoringsglas apotek: apotek leverans samma dag Рapotek h̴ravfall
los algodones pharmacy online: mexico drug store online – can i buy meds from mexico online
https://mexicorate.icu/# order antibiotics from mexico
Viagra sans ordonnance 24h Amazon: Sildenafil teva 100 mg sans ordonnance – Viagra sans ordonnance livraison 48h
Svenska Pharma Svenska Pharma lasarett apotek
Viagra prix pharmacie paris: Viagra sans ordonnance 24h Amazon – Acheter Sildenafil 100mg sans ordonnance
apotek expressleverans: Svenska Pharma – Svenska Pharma
https://pharmrate.online/# pharmacy mexico online
Viagra homme prix en pharmacie sans ordonnance: SildГ©nafil 100 mg prix en pharmacie en France – Viagra pas cher livraison rapide france
Viagra sans ordonnance 24h: Viagra homme sans ordonnance belgique – Viagra pas cher inde
https://sansordonnancefr.icu/# Viagra homme sans prescription
Viagra homme prix en pharmacie sans ordonnance: Viagra pas cher inde – Viagra vente libre pays
Viagra femme ou trouver: Meilleur Viagra sans ordonnance 24h – Prix du Viagra en pharmacie en France
надежные букмекерские конторы [url=www.snatkina.borda.ru/?1-5-0-00000373-000-0-0]надежные букмекерские конторы[/url]
mexican meds: pharmacy in mexico that ships to us – the purple pharmacy mexico
https://pharmrate.online/# online mexico pharmacy
п»їmexican pharmacy mexican pharmacy what to buy order medication from mexico
online mexico pharmacy: mexican pharmacy what to buy – mexican farmacia
Viagra en france livraison rapide: Viagra prix pharmacie paris РSild̩nafil 100mg pharmacie en ligne
mexican online pharmacy wegovy: mexican pharmacy online – mexican pharma
https://sansordonnancepharm.online/# Acheter viagra en ligne livraison 24h
online drugs order: mexi pharmacy – mexi pharmacy
Svenska Pharma: Svenska Pharma – apotek recept hemleverans
https://sansordonnancefr.icu/# п»їViagra sans ordonnance 24h
Viagra sans ordonnance livraison 24h: Quand une femme prend du Viagra homme – Viagra sans ordonnance 24h suisse
tijuana pharmacy online: mexico prescriptions – mexican online mail order pharmacy
Viagra homme prix en pharmacie sans ordonnance: SildГ©nafil 100 mg prix en pharmacie en France – Viagra pas cher livraison rapide france
1win yeni oyunlar 1win yeni oyunlar
https://pharmserate.icu/# Svenska Pharma
Svenska Pharma: pris receptbelagda läkemedel – naproxen apotek
Viagra vente libre allemagne: Viagra homme prix en pharmacie sans ordonnance – Viagra homme prix en pharmacie sans ordonnance
online pharmacy in mexico: mexico online farmacia – good online mexican pharmacy
1win tranzactii sigure [url=1win39929.help]1win39929.help[/url]
ufc 330 fight card: islam makhachev ufc – ufc 330
1win slots turniri http://1win71277.help/
https://ufc-330.com/# ufc 330
ufc 330 tickets: ufc 330 start time – ufc 330 fight card
ufc: islam makhachev ufc – Islam Makhachev
https://ufc-330.shop/# ufc
ufc 330: ufc – ufc
https://ufc-330.com/# ufc
ufc 330 tickets: ufc fight night – ufc 330 start time
https://ufc-330.shop/# ufc 330 tickets
http://ufc-330.com/# Islam Makhachev
1win bonus offer http://1win47293.help/
ufc 330 start time: ufc 330 start time – Islam Makhachev
https://ufc-330.shop/# ufc fight night
Viagra en france livraison rapide: Viagra pas cher livraison rapide france – Viagra sans ordonnance livraison 48h
https://pharmrate.monster/# mexican pharma
Many thanks, An abundance of information!
Wein Plaza – https://weinplaza.com/
order medicine from mexico: farmacias mexicanas – mexican pharmacy online medications
https://pharmmex.sbs/# mexican pharmacies that ship
Viagra sans ordonnance 24h Amazon: Viagra homme prix en pharmacie – Viagra sans ordonnance livraison 48h
https://frsansordonnance.online/# п»їViagra sans ordonnance 24h
legitimate mexican pharmacy online: can i order online from a mexican pharmacy – tijuana pharmacy online
https://frsansordonnance.online/# Viagra pas cher paris
ansiktsmask tyg apotek: apotek fri frakt – collagen kapslar
mostbet uduş manat çıxarış http://www.mostbet02606.online
https://frsansordonnance.online/# Viagra femme ou trouver
https://sepharmtop.online/# Svenska Pharma
1win задержка вывода https://www.1win75197.online
melbet рабочее зеркало melbet рабочее зеркало
mostbet Тоҷикистон download https://mostbet33044.online/
https://swtop.online/# apotek vГҐrdcentral
mostbet regisztráció appban http://mostbet44364.online
https://pharmmex.sbs/# mexican pharmacys
https://sepharmtop.online/# vape rea
мостбет правила пополнения http://mostbet70131.online
mail order pharmacy india: india pharmacy – online pharmacy no prescription needed
http://healthspherepharmacy.com/# indian pharmacies safe
online mexican pharmacy: mexican pharmacy online – online mexican pharmacy
https://healthspherepharmacy.shop/# pharmacy website india
1win aviator pe mobil 1win aviator pe mobil
online pharmacy india: indian online pharmacy – best online pharmacy no prescription
мелбет бонус на первый депозит казино https://melbet38319.online/
https://northbridgepharm.shop/# canada pharmacy
mexico pharmacy: mexican pharmacy online – mexican pharmacy online
pin-up depozit bonusi pinup38742.help
mexico pharmacy: online mexican pharmacy – mexican pharmacy
https://healthspherepharmacy.com/# pharmacy website india
mostbet lucky jet online http://www.mostbet35880.online
1win retragere Payeer https://1win34308.help
mostbet kupon kod http://mostbet39687.help/
mexico pharmacy: online mexican pharmacy – CasaSalud Pharmacy
https://healthspherepharmacy.com/# online pharmacy india
canadian prescription pharmacy: canadian online pharmacy – canada pharmacy online
https://casasaludpharmacy.com/# CasaSalud Pharmacy
canadian prescription pharmacy: canada online pharmacy – pharmacy in canada
http://casasaludpharmacy.com/# mexico pharmacy
canada online pharmacy: online canadian pharmacy – pharmacy in canada
мостбет чат поддержки http://mostbet11528.online/
J’ai testé plusieurs plateformes sans jamais être satisfait. Tout le monde recommandait des adresses différentes, dur de s’y retrouver. J’ai vérifié les dernières mises à jour pour lancer le processus sans erreur. J’ai finalement déniché la bonne source et je voulais vous partager tous les détails, vous pouvez consulter les informations à jour ici: 1xbet download [url=https://shooters-pro.com]1xbet download[/url]. Bref, ce que je voulais vous dire — l’appli tourne parfaitement sur mon smartphone.
les mises à jour se font automatiquement. Pour être honnête, c’est la plus stable que j’ai testée — ne perdez plus votre temps avec d’autres sites. Bonne chance à tous…
online canadian pharmacy: NorthBridge Pharmacy – best canadian pharmacy
https://northbridgepharm.shop/# canada pharmacy online
NorthBridge Pharmacy: NorthBridge Pharmacy – canadian pharmacy online
https://casasaludpharmacy.shop/# mexican pharmacy online
melbet support bangladesh http://melbet97946.online/
mexican pharmacy: online mexican pharmacy – CasaSalud Pharmacy
https://healthspherepharmacy.com/# reputable indian online pharmacy
online canadian pharmacy: canada pharmacy – canadian pharmacy
mostbet crash коэффициенты https://mostbet72681.help
https://casasaludpharmacy.com/# mexico pharmacy
mexican online pharmacy: CasaSalud Pharmacy – mexican pharmacy online
melbet коэффитсиенти беҳтарин http://melbet73919.online/
http://casasaludpharmacy.com/# mexican pharmacy
indian pharmacy: indian online pharmacy – reputable overseas online pharmacies
canadian prescription pharmacy: canadian pharmacy – pharmacy in canada
https://northbridgepharm.shop/# canada online pharmacy
mail order pharmacy india: indian pharmacy online – overseas online pharmacy
http://northbridgepharm.com/# NorthBridge Pharmacy
canadian prescription pharmacy: best canadian pharmacy – canada pharmacy online
https://pharmaciefr.click/# Viagra gГ©nГ©rique sans ordonnance en pharmacie
Svenska Pharma: ta blodtryck pГҐ apotek – Svenska Pharma
https://svenskapharm.click/# Svenska Pharma
Viagra homme prix en pharmacie sans ordonnance: Acheter Sildenafil 100mg sans ordonnance – SildГ©nafil 100 mg prix en pharmacie en France
mines 1win mines 1win
pin up hisobni to‘ldirish ishlamayapti https://www.pinup64200.help
https://svenskapharm.click/# apotek us
Viagra en france livraison rapide: Prix du Viagra 100mg en France – SildГ©nafil 100 mg sans ordonnance
бонус мостбет http://mostbet15298.online/
mostbet поддержка whatsapp http://mostbet99204.online
mexi pharmacy: mexican pharmacies online – mail order pharmacies
https://mexicoexpharm.click/# pharmacia mexico
mostbet kurzovní lístek https://www.mostbet36836.online
mostbet Toshkent mostbet42672.help
Meilleur Viagra sans ordonnance 24h: Viagra gГ©nГ©rique sans ordonnance en pharmacie – Viagra vente libre pays
мостбет скачать apk бесплатно zakaz.kg
https://svenskapharm.click/# Svenska Pharma
mexican medicine: farmacia pharmacy mexico purchase online – mexican online mail order pharmacy
https://svenskapharm.click/# halstabletter apotek
Svenska Pharma: tablett medicin – apotek kollagen
https://mexicoexpharm.click/# best mexican online pharmacy
Viagra Pfizer sans ordonnance: Viagra gГ©nГ©rique sans ordonnance en pharmacie – SildГ©nafil 100 mg sans ordonnance
SildГ©nafil Teva 100 mg acheter: Viagra homme sans ordonnance belgique – Viagra prix pharmacie paris
order meds from mexico: pharmacy in mexico that ships to us – worldwide pharmacy
mostbet zakłady na konie http://www.mostbet18361.online
farmacia pharmacy mexico: mexico pharmacy – mexicanrxpharm
https://mexicopharmrate.click/# mexican pharmacies online drugs
1win setare limba romana https://1win15726.help/
mostbet лимит ставок https://mostbet91325.help/
https://modafinil.pro/# order Provigil without prescription
https://cenforce.cheap/# cenforce
cymbalta for pain: buy cymbalta online – buy cymbalta online
https://modafinil.pro/# Modafinil Pro
https://modafinil.pro/# Modafinil for focus and productivity
cenforce price: cenforce cheap – buy cenforce
1win Ош расмий сайт http://www.1win50917.help
https://cymbalta.top/# buy cymbalta online
https://cymbalta.top/# cymbalta for pain
pregabalin life: lyrica generic – lyrica price
https://modafinil.pro/# safe Provigil online delivery service
https://pregabalin.life/# pregabalin life
mostbet instalare pe xiaomi mostbet instalare pe xiaomi
1вин лаки джет 1вин лаки джет
instalare 1win https://1win04957.help/
order Provigil without prescription: Modafinil for ADHD and narcolepsy – buy Modafinil online USA
how to start aviator crash game http://aviator62775.online
https://pregabalin.life/# lyrica medication
1win lucky jet demo http://1win65005.help
https://pregabalin.life/# lyrica online
https://cenforce.cheap/# buy cheap cenforce
cenforce tablet: cenforce cheap – cenforce price
mostbet telefon raqami http://www.mostbet36602.help
https://cymbalta.top/# cymbalta for pain
https://modafinil.pro/# affordable Modafinil for cognitive enhancement
cymbalta for pain: cymbalta medication – generic cymbalta
https://cenforce.cheap/# buy cheap cenforce
pin up Fargʻona pinup24541.help
https://medfrance.top/# Viagra Pfizer sans ordonnance
https://medfrance.top/# Prix du Viagra 100mg en France
SildГ©nafil 100 mg sans ordonnance: Viagra pas cher inde – SildГ©nafil 100 mg prix en pharmacie en France
https://farmaciaspain.online/# farmacias online seguras en espaГ±a
https://farmaciaspain.online/# farmacia online 24 horas
https://medmexico.online/# mexican pharmacy near me
farmacias online seguras: farmacia online espaГ±a envГo internacional – farmacia online barata
https://medmexico.online/# pharmacy in mexico that ships to us
https://medsmexican.blog/# online pharmacy mexico
https://farmaciasinreceta.top/# farmacia online barcelona
mexico medicine: mexico pharmacy price list – order antibiotics from mexico
https://farmaciaspain.online/# farmacias online seguras en espaГ±a
https://medmexico.online/# mexican meds
https://medsmexican.blog/# mexico pharmacy order online
https://medmexico.online/# mexican pharmacies
https://medfrance.top/# Viagra sans ordonnance 24h Amazon
Viagra Pfizer sans ordonnance: Viagra homme prix en pharmacie sans ordonnance – Viagra 100mg prix
https://medfrance.top/# Viagra 100mg prix
https://medmexico.online/# worldwide pharmacy
https://medmexico.online/# pharmacy in mexico city
Acheter Sildenafil 100mg sans ordonnance: Prix du Viagra 100mg en France – Viagra homme prix en pharmacie sans ordonnance
https://farmaciasinreceta.top/# farmacias online seguras
https://medsmexican.blog/# mexico meds
https://farmaciasinreceta.top/# farmacia online envГo gratis
https://farmaciaspain.online/# farmacia online espaГ±a envГo internacional
https://farmaciasinreceta.top/# farmacia barata
farmacias online seguras en espaГ±a: farmacia online barata y fiable – farmacias online seguras
mexican pharmacy las vegas medication in mexico pharmacy mexico
https://medfrance.top/# Viagra 100mg prix
https://medfrance.top/# Viagra homme sans ordonnance belgique
https://farmaciaspain.online/# farmacia online barcelona
Viagra sans ordonnance 24h Amazon Viagra gГ©nГ©rique pas cher livraison rapide Viagra 100mg prix
Viagra pas cher livraison rapide france: Viagra sans ordonnance livraison 24h – Viagra sans ordonnance pharmacie France
https://medfrance.top/# Viagra homme sans prescription
aviator no reclame aqui aviator no reclame aqui
1win cashback https://www.1win61873.help
farmacias direct farmacia online barcelona farmacia online envГo gratis
https://farmaciaspain.online/# farmacias online baratas
https://farmaciaspain.online/# farmacias online seguras en espaГ±a
purple pharmacy mexico los algodones pharmacy online progreso, mexico pharmacy online
https://medfrance.top/# Viagra homme prix en pharmacie sans ordonnance
mostbet fotbal mostbet fotbal
как скачать mostbet на android как скачать mostbet на android
pin-up kirish Oʻzbekiston pinup24711.help
1win ghid inregistrare https://www.1win53014.help
https://medfrance.top/# SildГ©nafil 100 mg prix en pharmacie en France
farmacia online madrid: farmacias direct – farmacias online seguras
1вин_kg http://1win17590.help
https://farmaciaspain.online/# farmacia online barata y fiable
Viagra Pfizer sans ordonnance п»їViagra sans ordonnance 24h Quand une femme prend du Viagra homme
1win табдили асъор 1win табдили асъор
https://medfrance.top/# Acheter viagra en ligne livraison 24h
п»їfarmacia online espaГ±a [url=https://farmaciaes.top/#]farmacia online espaГ±a envГo internacional[/url] farmacias online baratas
https://farmaciabarc.online/# farmacia online envГo gratis
farmacias online baratas: farmacia online envГo gratis – farmacias online seguras
https://farmaciabarc.online/# farmacia online barcelona
farmacia barata farmacias online seguras farmacias online seguras
Viagra pas cher livraison rapide france Viagra femme ou trouver SildГ©nafil 100mg pharmacie en ligne
https://pharmmxus.online/# best mexican pharmacy
mostbet вывести сомы [url=http://mostbet77382.online/]http://mostbet77382.online/[/url]
Quand une femme prend du Viagra homme Viagra pas cher inde Viagra vente libre pays
farmacia online barata: farmacia barata – farmacia barata
https://frpharmacies.icu/# Viagra femme ou trouver
https://farmaciaes.top/# farmacia barata
mexican rx pharm [url=https://pharmmxus.online/#]mexico online pharmacy[/url] pharmacys in mexico
https://farmaciaes.top/# farmacia barata
1вин уз авиатор http://www.1win67466.online
https://frpharmacies.icu/# Viagra vente libre allemagne
farmacia online barata farmacia online espaГ±a envГo internacional farmacias online seguras
pharmacy mexico: mexico medicine – pharmacies in mexico that ship to the us
https://pharmmxus.online/# online pharmacies in mexico
online mexican pharmacy [url=https://pharmustomex.top/#]mexican drug store[/url] purple pharmacy online ordering
https://farmaciabarc.online/# farmacia en casa online descuento
farmacias online seguras en espaГ±a [url=https://farmaciaes.top/#]farmacia online madrid[/url] farmacias online seguras en espaГ±a
https://pharmustomex.top/# hydrocodone mexico pharmacy
pharmacy delivery: my mexican pharmacy – progreso mexico pharmacy online
mexican medicine store mexico pet pharmacy medication in mexico
https://frpharmacies.icu/# SildГ©nafil Teva 100 mg acheter
https://farmaciaes.top/# farmacia online madrid
mostbet app təhlükəsiz mostbet app təhlükəsiz
melbet время вывода https://melbet72136.online/
mostbet cashback http://mostbet29665.online/
mostbet баргардонидани маблағ http://mostbet60008.online
https://pharmustomex.top/# medicine from mexico
farmacias online seguras en espaГ±a farmacia online barata farmacia online madrid
https://farmaciaes.top/# farmacias online seguras en espaГ±a
mexican pharmacy what to buy my mexican pharmacy medication from mexico
mexican pharmacies that ship to us: best online mexican pharmacy – mexico online farmacia
https://farmaciaes.top/# farmacias online seguras
melbet plinko bonus [url=https://melbet56045.help]https://melbet56045.help[/url]
farmacia online envГo gratis farmacia barata farmacias online seguras
мостбет установка apk мостбет установка apk
https://farmaciabarc.online/# farmacia online espaГ±a envГo internacional
buy drugs online [url=https://pharmustomex.top/#]online pharmacies in mexico[/url] purple pharmacy
https://frpharmacies.icu/# Acheter Sildenafil 100mg sans ordonnance
1win depozit vaxtı [url=http://1win46318.help]http://1win46318.help[/url]
the purple pharmacy mexico: progreso, mexico pharmacy online – pharmacy in mexico online
plinko mostbet strategie [url=http://mostbet52410.online/]plinko mostbet strategie[/url]
https://pharmustomex.top/# mexico pet pharmacy
https://pharmustomex.top/# pharmacia mexico
farmacias direct [url=https://farmaciaes.top/#]farmacia online madrid[/url] farmacias direct
https://pharmmxus.online/# mexican pharmacies near me
Viagra Pfizer sans ordonnance [url=https://frpharmacies.icu/#]Prix du Viagra en pharmacie en France[/url] п»їViagra sans ordonnance 24h
https://farmaciaes.top/# farmacias online seguras en espaГ±a
buy medicines online in india NovaForm foreign online pharmacy
mostbet uduş almaq mostbet uduş almaq
http://mednavigatorpharmacys.com/# MedNavigator
SaludBridge Pharmacy: order antibiotics from mexico – mexican pharmacies that ship to us
https://novaformpharmacy.shop/# indian pharmacy paypal
aviator no reclame aqui aviator no reclame aqui
https://mednavigatorpharmacys.shop/# MedNavigator
reputable indian pharmacies: NovaForm Pharmacy – pharmacy order online
https://saludbridgepharmacy.shop/# SaludBridge Pharmacy
canada pharmacy reviews MedNavigator MedNavigator
http://mednavigatorpharmacys.com/# precription drugs from canada
aviator केवाईसी रिजेक्ट https://aviator28045.help/
aviator lucky jet download http://aviator31708.help/
mostbet sayt açılmır mostbet sayt açılmır
Online medicine home delivery: NovaForm – online pharmacy
https://mednavigatorpharmacys.shop/# canadian pharmacy ed medications
http://mednavigatorpharmacys.com/# MedNavigator
MedNavigator: MedNavigator – adderall canadian pharmacy
MedNavigator MedNavigator Pharmacy medication canadian pharmacy
http://novaformpharmacy.com/# mail order pharmacy india
http://novaformpharmacy.com/# top online pharmacy india
top 10 online pharmacy in india: NovaForm Pharmacy – no prescription pharmacy paypal
plinko 1win http://1win67262.online
http://saludbridgepharmacy.com/# order medicine from mexico
https://saludbridgepharmacy.shop/# mexican pharma
indian pharmacies safe NovaForm medicine online
https://mednavigatorpharmacys.shop/# MedNavigator Pharmacy
SaludBridge Pharmacy: SaludBridge Pharmacy – SaludBridge Pharmacy
https://novaformpharmacy.com/# top 10 pharmacies in india
https://novaformpharmacy.shop/# top 10 online pharmacy in india
MedNavigator: MedNavigator – MedNavigator
https://saludbridgepharmacy.com/# farmacias mexicanas
https://mednavigatorpharmacys.shop/# canadian drug pharmacy
MedNavigator Pharmacy: canadian pharmacy store official website – MedNavigator
http://mednavigatorpharmacys.com/# MedNavigator
mexico city pharmacy mexico prescription online SaludBridge Pharmacy
https://novaformpharmacy.shop/# п»їlegitimate online pharmacies india
plinko cannot register https://plinko45619.help
MedNavigator Pharmacy: MedNavigator – reputable canadian pharmacy
https://novaformpharmacy.com/# indian pharmacy paypal
https://novaformpharmacy.com/# top 10 online pharmacy in india
mostbet Samarqand click mostbet Samarqand click
best online canadian pharmacy: MedNavigator Pharmacy – MedNavigator Pharmacy
http://saludbridgepharmacy.com/# mexican pharmacies near me
http://saludbridgepharmacy.com/# mexican online pharmacies
мостбет android Киргизия http://mostbet18868.online/
best online pharmacy india cheapest online pharmacy india online pharmacy discount code
SaludBridge: pharmacy delivery – SaludBridge
мостбет aviator коэффициенты http://mostbet69815.online/
мостбет crash Кыргызстан мостбет crash Кыргызстан
http://mednavigatorpharmacys.com/# canadian pharmacy store official website
https://novaformpharmacy.shop/# india pharmacy
SaludBridge: pharmacy mexico city – SaludBridge Pharmacy
http://novaformpharmacy.com/# buy prescription drugs from india
http://saludbridgepharmacy.com/# SaludBridge Pharmacy
https://mednavigatorpharmacys.com/# MedNavigator
online pharmacy india: NovaForm – online pharmacy
https://saludbridgepharmacy.shop/# SaludBridge Pharmacy
http://farmaciaesptop.online/# farmacias online seguras
https://francepharmacies.icu/# Meilleur Viagra sans ordonnance 24h
Viagra pas cher livraison rapide france: Sildenafil teva 100 mg sans ordonnance – Viagra gГ©nГ©rique sans ordonnance en pharmacie
https://farmaciabarca.top/# farmacia online envГo gratis
https://francepharmacies.icu/# SildГ©nafil 100 mg prix en pharmacie en France
farmacia online envГo gratis farmacia online espaГ±a envГo internacional farmacias online seguras en espaГ±a
mexican pharmacies that ship to us: mexican pharmacy las vegas – mexico pharmacy price list
мелбет киберспорт cs2 ставки https://melbet30147.online/
как пройти регистрацию mostbet как пройти регистрацию mostbet
melbet helpline https://melbet64624.online/
aviator plinko game download https://www.aviator07349.online
https://mxhealthrate.icu/# mexican pharmacy ship to usa
http://farmaciaesptop.online/# farmacias online seguras en espaГ±a
мостбет android приложение Кыргызстан https://mostbet44719.online
https://francepharmacies.icu/# Viagra générique sans ordonnance en pharmacie
mexican meds: mexico farmacia – mexican pharmacy las vegas
https://francepharmacies.icu/# Viagra sans ordonnance livraison 48h
https://francepharmacies.icu/# Viagra sans ordonnance 24h Amazon
1win вход без регистрации http://www.1win54722.online
farmacia online madrid: farmacias online seguras en espaГ±a – farmacia online madrid
http://farmaciaestop.online/# farmacia online madrid
http://mexicanpharmfast.online/# mexican drug stores
мелбет как играть в lucky jet melbet13861.online
Viagra homme prix en pharmacie sans ordonnance Viagra sans ordonnance livraison 48h Viagra pas cher livraison rapide france
mostbet зеркало официальный сайт http://mostbet86491.online/
http://farmaciaesptop.online/# farmacia barata
http://farmaciaestop.online/# farmacias online seguras en españa
farmacia online madrid: farmacias online baratas – п»їfarmacia online espaГ±a
https://francepharmacies.icu/# Le gГ©nГ©rique de Viagra
https://mxhealthrate.icu/# mexico prescription online
farmacia online espaГ±a envГo internacional: farmacia online barata – farmacia online barcelona
https://mxhealthrate.icu/# buy drugs online
https://farmaciabarca.top/# farmacia online espaГ±a envГo internacional
mexico pharmacy price list mexican pharmacys mexican online pharmacies
https://generixpharm.shop/clomid-clomiphene-mechanisms/# can i order generic clomid price
Viagra homme prix en pharmacie sans ordonnance: Viagra 100mg prix – Viagra gГ©nГ©rique sans ordonnance en pharmacie
http://farmaciaestop.online/# farmacia barata
http://mexicanpharmfast.online/# mexican medicine
melbet identification https://www.melbet83310.help
мостбет не устанавливается apk https://mostbet26814.help
https://paydaybesthub.com/# online payday loans today
most reputable payday loan companies: instant cash advance online – payday loans online no credit
http://paydaybesthub.com/# payday loans online same day
pinup apk qanday o‘rnatish pinup apk qanday o‘rnatish
most reputable payday loans cash advance no interest payday loans online with instant approval
https://generixpharm.shop/cytotec-misoprostol-guidelines/# cytotec pills buy online
https://paydaybesthub.shop/# most reputable payday loan companies
mostbet turnir jadvali mostbet turnir jadvali
http://paydaybesthub.com/# actual payday loan lenders online
reputable payday loan lenders: Payday Best Hub – payday loans online
http://paydaybesthub.com/# reputable payday loan lenders
payday loans that approve everyone: Payday Best Hub – payday loans direct lenders
https://paydaybesthub.shop/# payday loans online apply
paycheck advance online Payday Best Hub best reliable payday loans
https://paydaybesthub.online/# instant cash advance online no credit check
https://generixpharm.shop/lasix-furosemide-protocols/# Generix Pharm
melbet bonus https://melbet90383.help/
payday loans online apply: Payday Best Hub – most trusted payday loan sites
https://paydaybesthub.shop/# paycheck advance online
http://paydaybesthub.com/# online payday loans
companies that offer payday loans: Payday Best Hub – payday loans online same day
https://paydaybesthub.shop/# always approved payday loans
cash advance online no fax Payday Best Hub instant cash advance online
https://paydaybesthub.online/# payday loans online
https://generixpharm.shop/propecia-finasteride-data/# GenerixPharm
payday loans online apply: instant cash advance no fee – instant cash advance online no credit check
https://paydaybesthub.shop/# payday loans online no interest
как зарегистрироваться в mostbet https://mostbet88517.online
https://paydaybesthub.com/# payday loans online apply
мостбет служба поддержки мостбет служба поддержки
1вин пополнение Киргизия http://1win28076.help
reputable payday loan lenders PaydayBestHub best approval payday loans
https://paydaybesthub.online/# payday loans online loan
best and quickest payday loans: best payday advance loans online – companies that offer payday loans
https://paydaybesthub.com/# best reliable payday loans
1win лицензия http://1win98802.online/
https://generixpharm.shop/# Independent Analysis of Generic Bioequivalence and Clinical Safety
https://paydaybesthub.com/# instant cash advance no fee
mostbet lucky jet bonus https://www.mostbet10542.help
mostbet вход 2026 https://mostbet01460.online
loans online instant approval with no credit: Payday Best Hub – instant cash advance no fee
http://paydaybesthub.com/# payday loans online loan
http://paydaybesthub.com/# payday loans that approve everyone
https://paydaybesthub.online/# get payday loan online today
loans till payday everyone approved: Payday Best Hub – payday loans online with instant approval
get payday loan online today PaydayBestHub instant cash advance online no credit check
mostbet sms təsdiq mostbet84891.online
http://paydaybesthub.com/# most reputable payday loans
https://generixpharm.shop/clomid-clomiphene-mechanisms/# get clomid without a prescription
https://paydaybesthub.shop/# always approved payday loans
most reliable payday loan company: Payday Best Hub – payday loans online instantly
https://paydaybesthub.online/# companies that offer payday loans
payday loans no interest: cash advance no interest – payday loans online apply
http://paydaybesthub.com/# payday loans online
loans till payday everyone approved Payday Best Hub payday loans online
http://paydaybesthub.com/# most reputable payday loan companies
aviator login ios aviator login ios
https://paydaybesthub.online/# payday loans online with instant approval
https://paydaybesthub.shop/# reputable payday loan lenders
melbet payment proof nagad http://www.melbet55504.online
https://paydaybesthub.online/# payday loans online apply
melbet тасдиқи аккаунт https://melbet75116.online
viagra Comprar Viagra original online Viagra genérica sin receta
https://lacefieldurology.shop/# order ed pills online
mostbet stronka mostbet stronka
https://lacefieldurology.com/# cheap ed pills
https://pediatraefrainvillalobos.com/# Efrain Villalobos Verduzco
https://lacefieldurology.com/# ed pills
Farmacia online envío gratis Pediatra Efrain Villalobos Farmacia online España
https://lacefieldurology.shop/# ed prescription online
https://ucipediatriatoledo.com/# UCI Pediatría
https://pediatraefrainvillalobos.com/# Farmacias baratas online envío gratis
https://lacefieldurology.com/# ed pills
https://lacefieldurology.shop/# ed rx online
cheap ed medicine Dr Lacefield online drugs order
http://lacefieldurology.com/# cheapest ed pills
mostbet póker http://www.mostbet34227.online
https://ucipediatriatoledo.shop/# Viagra genérico precio
мелбет промокод при регистрации melbet58323.online
как ввести промокод melbet http://www.melbet66023.online
http://ucipediatriatoledo.com/# UCI Pediatría Toledo
https://lacefieldurology.com/# ed treatment online
UCI Pediatría viagra Comprar Viagra en España
https://pediatraefrainvillalobos.com/# Farmacias baratas online envío gratis
mostbet retragere rapida Moldova mostbet retragere rapida Moldova
https://ucipediatriatoledo.shop/# Comprar Viagra online seguro
farmacia online barata Farmacia online envío gratis Farmacias baratas online envío gratis
https://lacefieldurology.com/# where can i get ed pills
мостбет app мостбет app
https://ucipediatriatoledo.com/# UCI Pediatría Toledo
https://lacefieldurology.com/# ed online pharmacy
барқароркунии парол мостбет https://www.mostbet33927.online
Comprar Viagra en farmacia sin receta UCI Pediatría Toledo Viagra genérico precio
vavada plik apk vavada plik apk
http://lacefieldurology.com/# cheap ed
melbet бк https://www.melbet31620.online
https://pediatraefrainvillalobos.shop/# farmacia online
https://pediatraefrainvillalobos.com/# farmacia online barata
cheap ed Lacefield Urology us pharmacy no prescription
https://pediatraefrainvillalobos.shop/# Farmacia online España
https://pediatraefrainvillalobos.com/# farmacia online barata
mostbet ore suport mostbet ore suport
https://pediatraefrainvillalobos.com/# Farmacias baratas online envío gratis
farmacia online Efrain Villalobos Verduzco farmacia online
http://ucipediatriatoledo.com/# Viagra genérico precio
мостбет доступ к сайту https://www.mostbet86043.help
mostbet depozit hesabda görünmür https://mostbet24939.online
aviator como pegar bônus aviator como pegar bônus
https://mexicomedsrx.online/# mexico medication
https://mexicanfastdelivery.top/# mexico drug store
melbet регистрация россия http://melbet25717.online/
https://mexicomedsrx.online/# mexican rx pharm
pin-up tez roʻyxatdan oʻtish http://pinup01611.help/
vavada bonus powitalny vavada bonus powitalny
https://mexicanusarx.online/# order antibiotics from mexico
https://vgrfrancepharm.online/# Viagra sans ordonnance 24h Amazon
https://mexicanusarx.online/# pharmacia mexico
https://mexicanfastdelivery.top/# farmacias online usa
https://sildfrancedelivery.icu/# SildГ©nafil 100 mg prix en pharmacie en France
мостбет контакты http://mostbet66053.online/
https://mexicanfastdelivery.top/# hydrocodone mexico pharmacy
мелбет слоты киргизия http://www.melbet56606.online
https://mexicomedsrx.online/# pharmacy mexico city
aviator rng aviator rng